# CRF Library
This is the user guide describes how the Case Report Forms (CRFs) are created and managed and how to define a Collection of CRFs in the Library of the OpenStudyBuilder application.

The system offers access to the following sub-menus in the Data Collection Standards menu:
| Sub-menu | Description |
|---|---|
| CRF Viewer | Display each CRF Collection in two formats: A CRF with annotations version and a copy of the Falcon version |
| CRF Builder. | The place to manage CRF metadata. Create Forms, ItemGroups and Items |
NB: Before being able to display any metadata in the CRF Viewer, the system needs to have at least one OSB Vendor Extension namespace. This information is available in the Administrative module, under the ODM Vendor Extensions module:
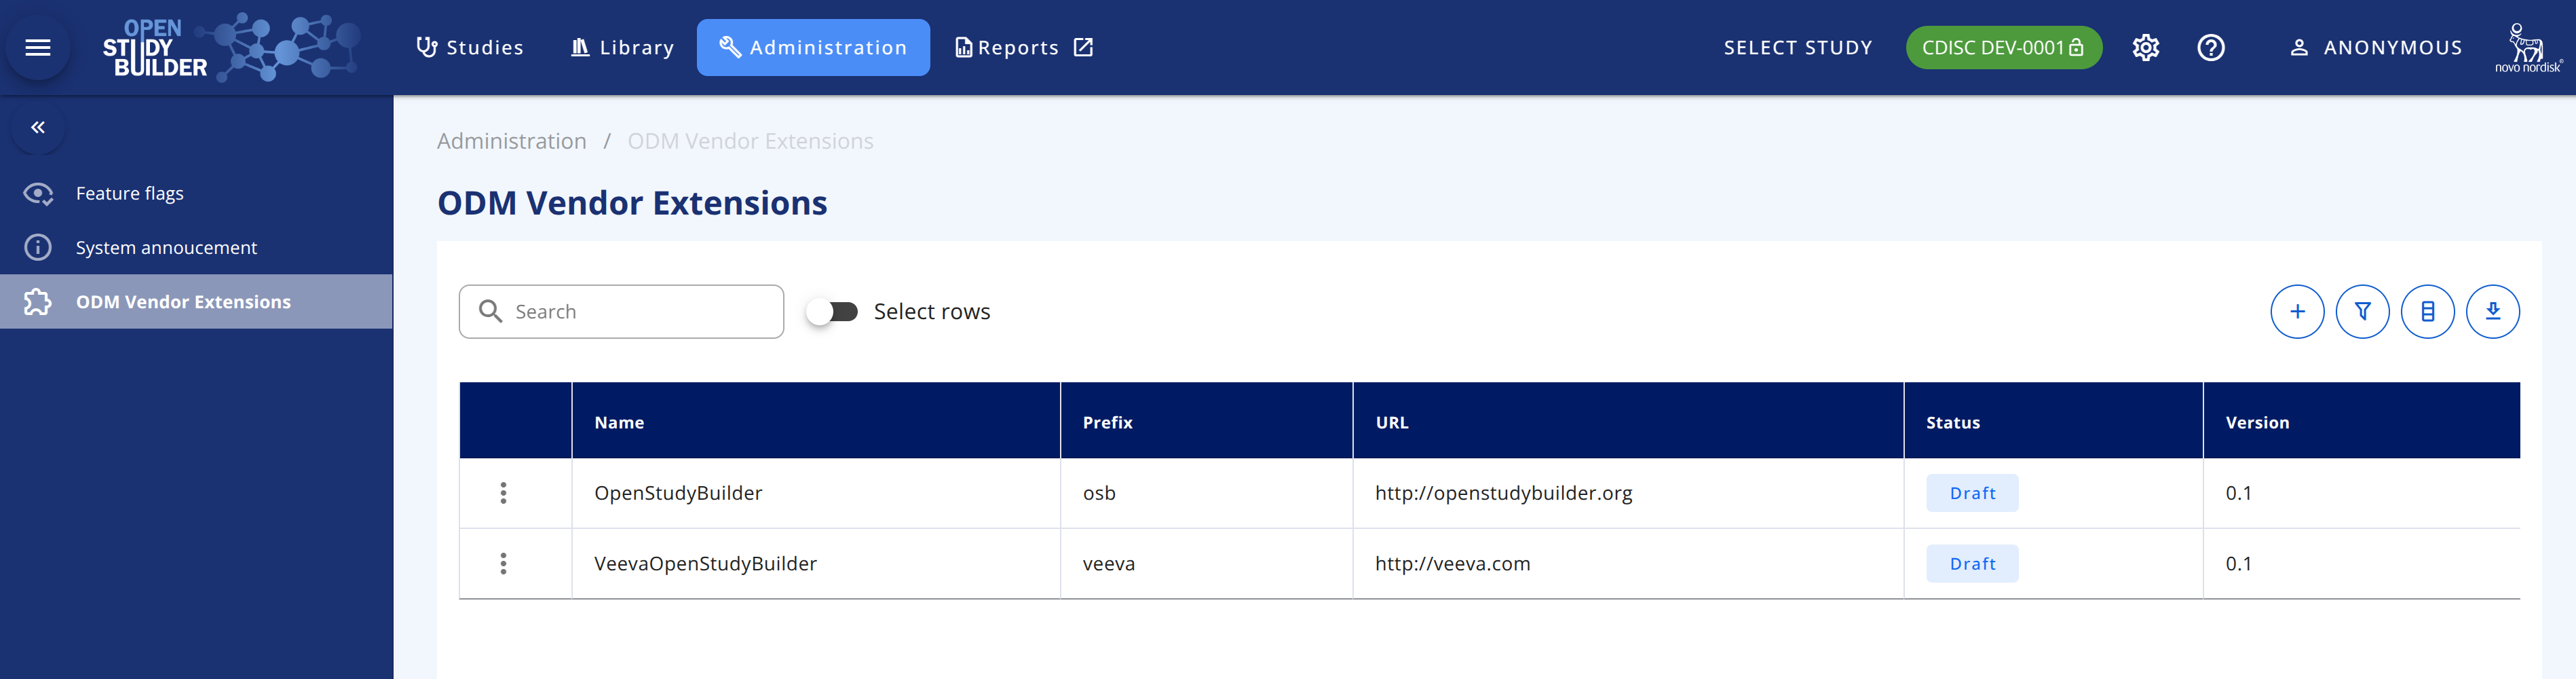
KWL:Comment (to be removed)
Does more need to be in place? stylesheet somewhere?# CRF Viewer
This page allows you to view a set of CRFs in a collection (standard forms). You can select one or more CRF Collection(s). The CRF drop-down will display the CRFs in the selected collection(s). The selections options in the drop-downs are multi-selection.
This viewer displays the LATEST version. For viewing a specific version use the CRF Viewer tab
To export, access the download symbol in the top-right side of the page.

# Stylesheets
You can select different stylesheet for viewing the CRFs. At the moment there are two stylesheets by default. Each of the stylesheets allow for viewing different information/annotation (like SDTM annotation).
Adding a new stylesheet needs to be done by a system administrator.
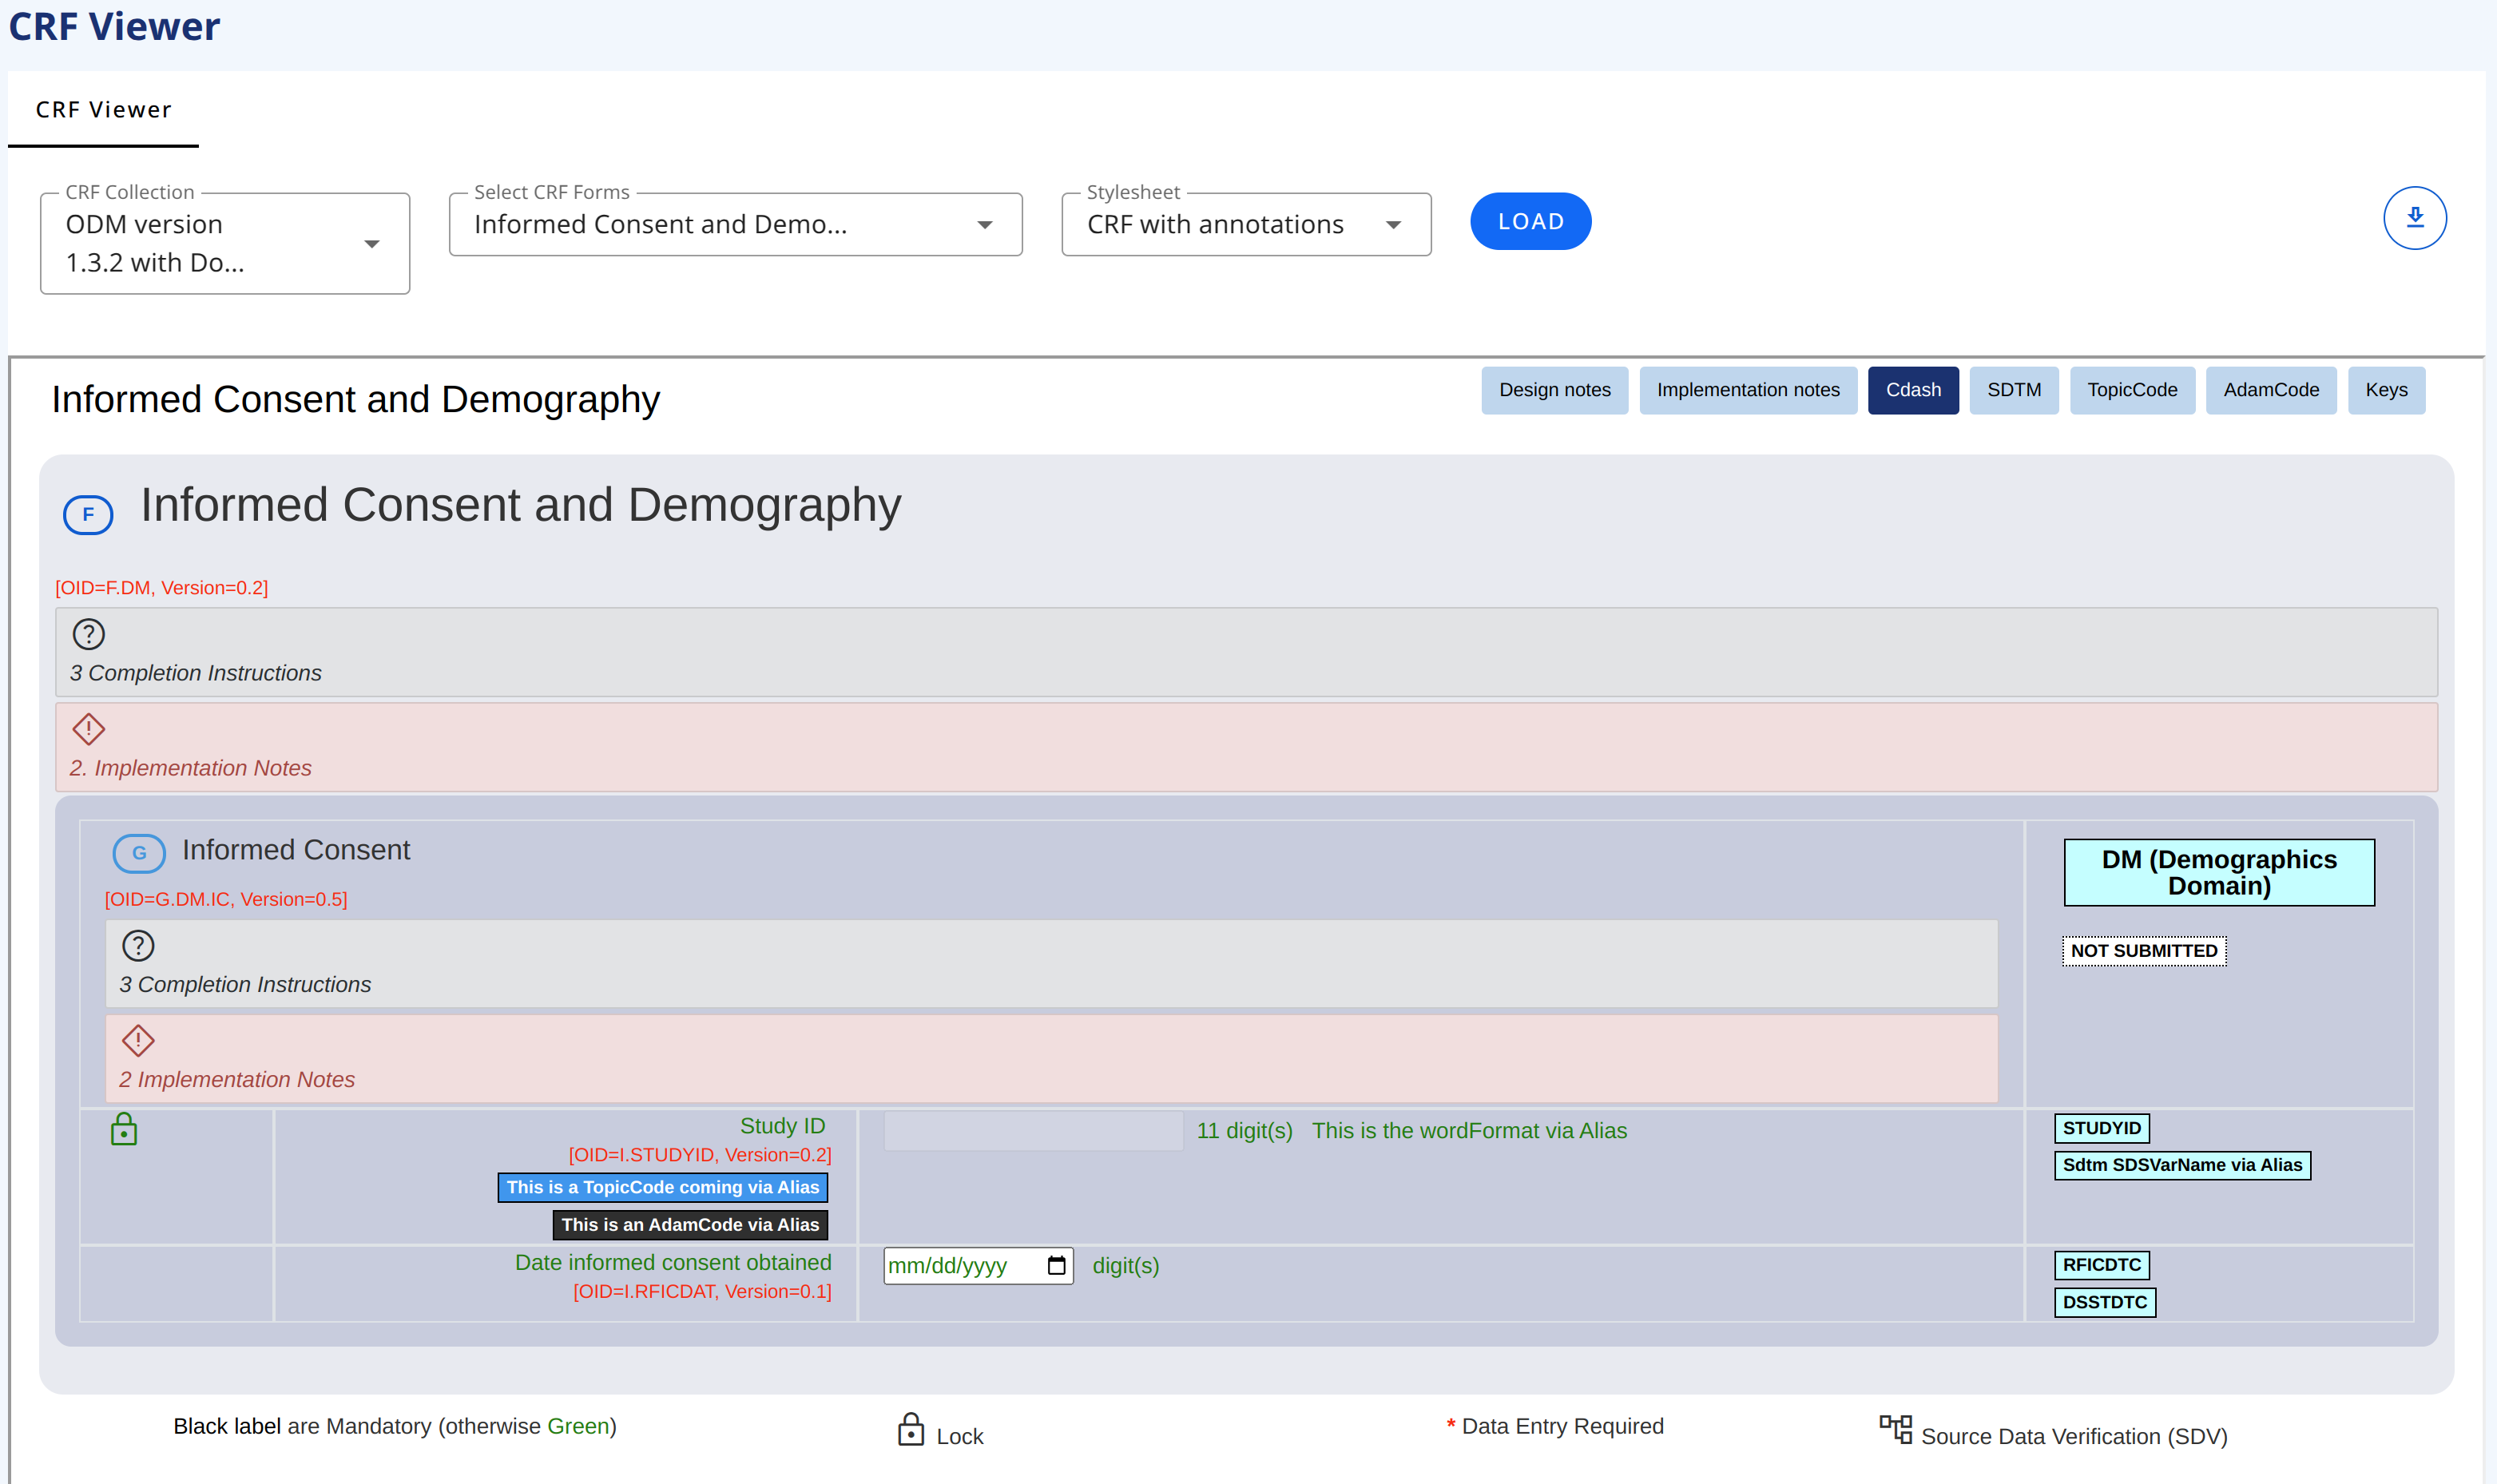
# CRF with Annotations stylesheet
CRF with Annotations stylesheet is displaying every metadata with implementation and completion guidelines as well as keys (ODM oid and version number).
Note that if for example implementation guideline is not displayed, then it is because it is not specified for the CRF, Item Group or Item, see sections Forms, Item Groups, Items for how to specify the metadata.
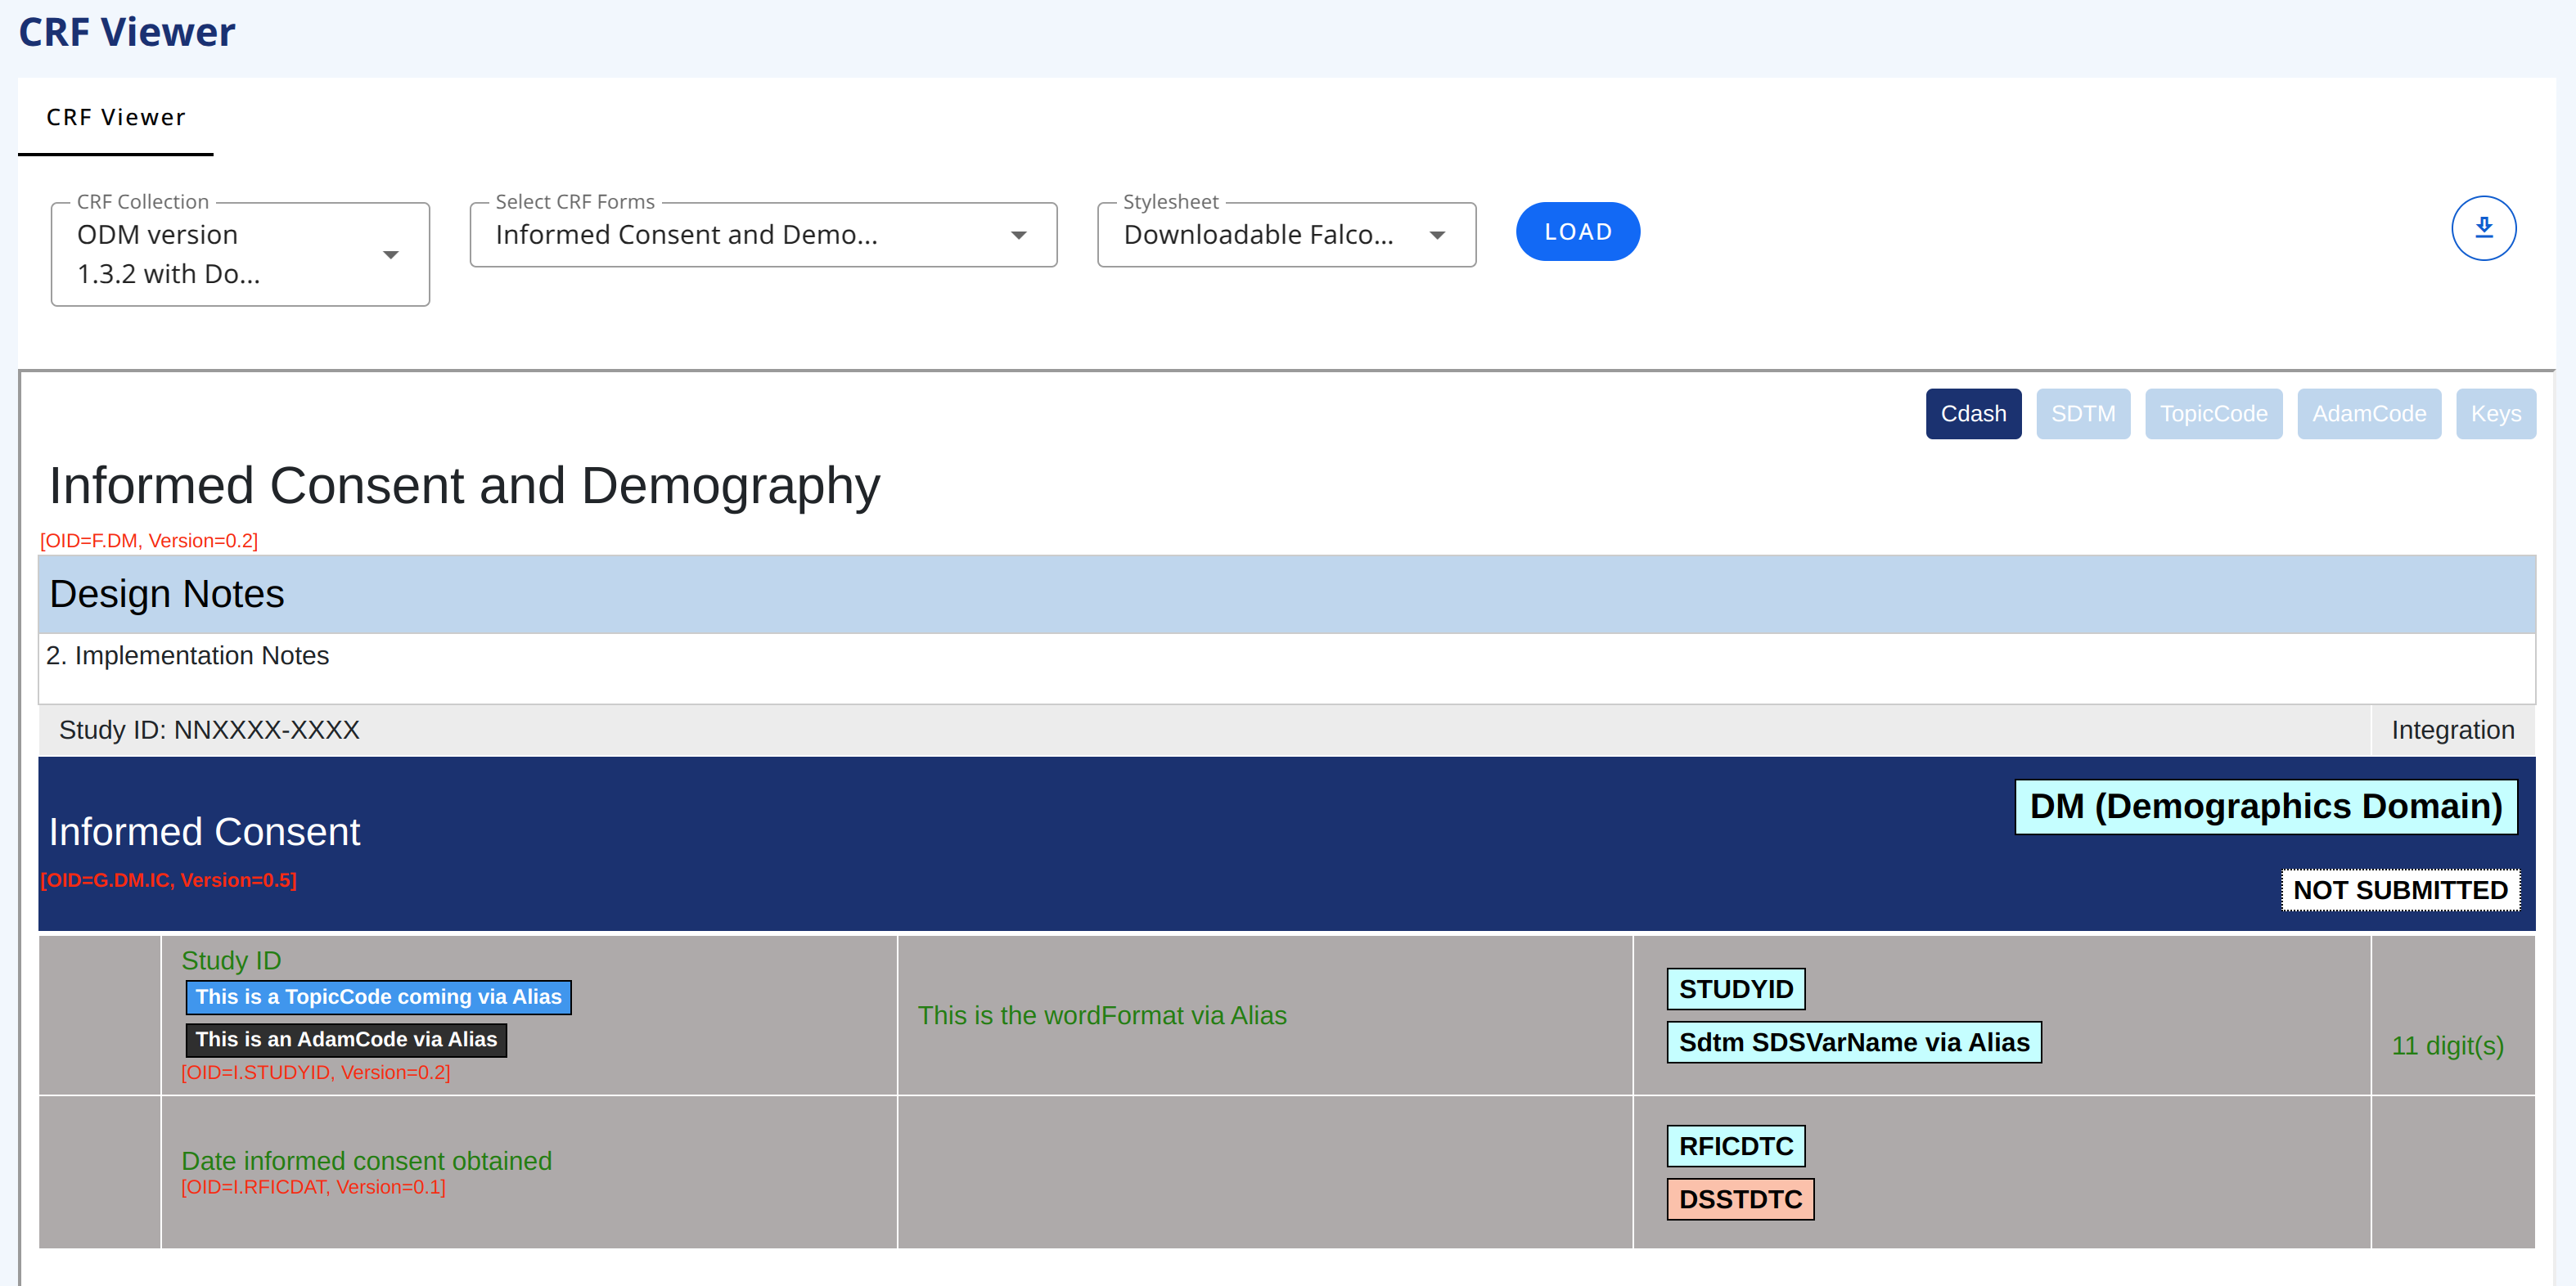
# Downloable Falcon (word) stylesheet
Downloadable Falcon (word) stylesheet is displaying a form using the Falcon format. It can be saved in HTML format and then imported into Word.
# CRF Builder
From the left menu bar, select CRF Builder (see Data Collection Standards - sub-menu).
The CRF Builder allows you to create Case Report Forms (CRFs) using modular building blocks. Each building block can be defined independently and then assembled into complete CRFs and collections of CRFs.
The CRF Builder uses four building blocks:
CRF Collections– Sets of Forms that make up complete data collection instrumentsForms– Structured pages containing one or more Item GroupsItem Groups– Collections of related Items grouped togetherItems– Individual data fields (e.g., a question, measurement, or data point)
These building blocks can be created in the following tabs/sub-menus:
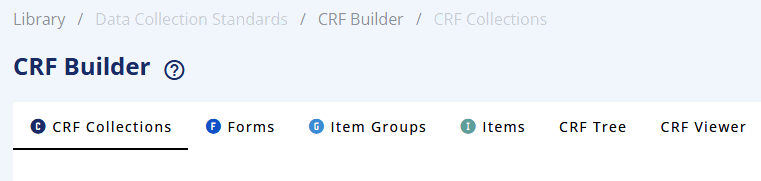
For CRF Tree and CRF Viewer tabs see Section CRF Tree and CRF Viewer tab, respectively.
| Tab | Description |
|---|---|
| CRF Collections | Displays the list of CRF Collections. In this menu you can create a CRF Collection, which is a 'container' for a collection of CRFs and version manage the CRF collection. If the collection contains CRFs (Forms, Item Groups and Items) it will make a final version of the whole CRF tree (see Section CRF tree). |
| Forms | Displays the list of Forms. Allow the definition of metadata related to the Form level. Allow the version management of a Form. If the Form contains Item Groups and Items it will make a final version of the whole Form tree (see Section CRF tree). |
| Item Groups | Displays the list of Item Groups. Allow the definition of metadata related to the Item Group level. Allow the version management of an Item Group. If the Item Group contains Items it will make a final version of the whole Item Group tree (see Section CRF tree). |
| Items | Display the list of Items. Allow the definition of metadata related to the Item level. Allow the version management of Items. |
| CRF Tree | Display the tree of CRF Collections, with Forms, with Item Groups and Items to produce the CRF specifications. |
| CRF Viewer | Allow you to display all elements of the CRF: CRF Collection, Form, Item Group or Item. There are two formats/styles: A CRF with annotations version and a copy of the Falcon version. This viewer allows for selecting a specific version of a CRF element. |
# General UI functions
In each of the tabs/sub-menus use a common user interface (see General tab menu UI below).
In the following the term element can be a CRF Collection, Forms, Item Groups, or Items. In the top right of the UI for the element the following is available:
| Button | Description | Name in User Guide |
|---|---|---|
 | Add a new element | Add |
 | Open the filtering optional fields to filter the list of the element | Filter |
 | Open the list of Columns to be displayed for the list of elements | ColumnSelector |
 | Allow the download of the selected list of elements, in CSV, JSON, XML or Excel format | Download |
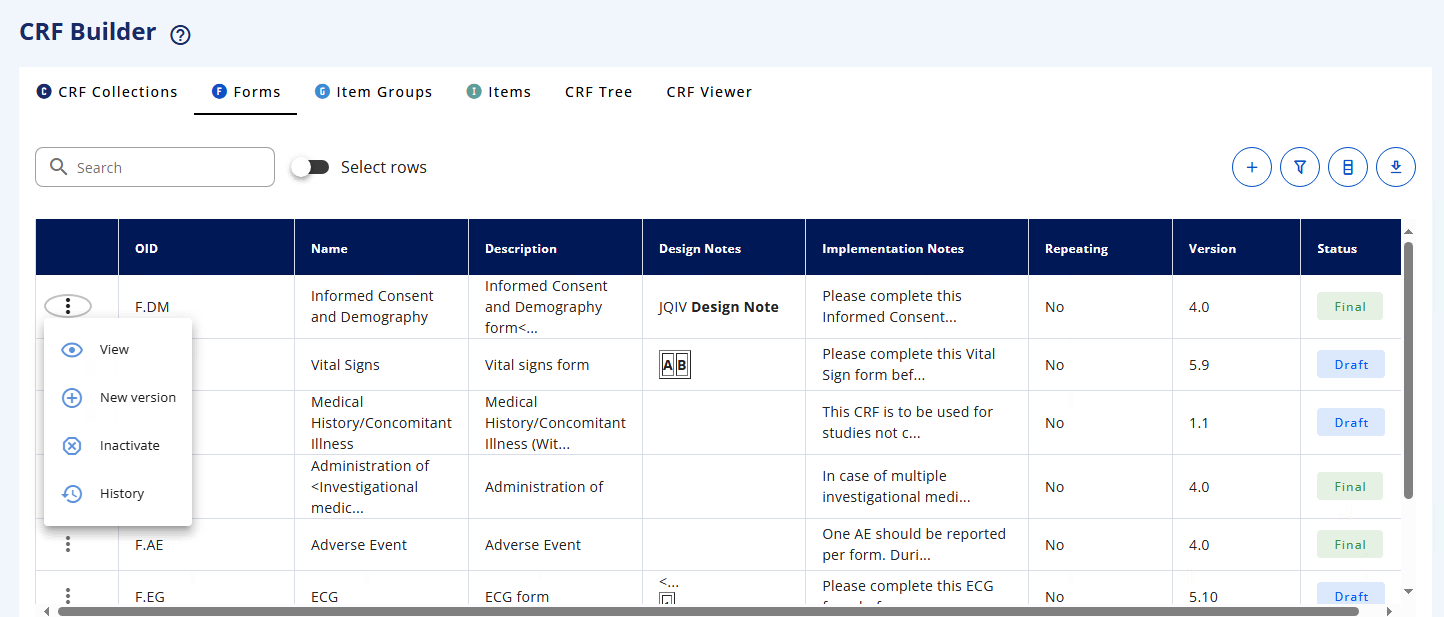
In the table view, the first column in the table contains a menu (symbol is three vertical dot) which is dedicated to the management of elements.
When clicking on the 3 dots, based on the status of the element, we have the following:
| Status | Button | Feature | Description |
|---|---|---|---|
| Draft |  | Approve | This will turn the Draft element into a Final version |
 | Edit | To edit an existing Draft element for update / modification | |
 | Delete | To delete an existing Draft element (work only for Version 0.1) | |
 | History | To show the audit trail of an existing Draft element through version and history | |
| Final |  | New version | This will turn a Final element version into a new Draft version with an updated Version number |
 | Inactivate | To retired an existing Final element | |
| History | To show the audit trail of an existing Final element through version and history | |
| Retired | | Delete | To delete a Retired element (Be careful, no warning) |
 | Reactivate | To reactivate a Retired element | |
| History | To show the audit trail of an existing Retired element through version and history |
# CRF Collections
In this tab the end user can manage CRF Collections of forms. The table displays the list of existing CRF Collection as Draft or Final (or Retired).
The table display the following information for each CRF Collection:
| Tab | Description |
|---|---|
| OID | Display the Object Identifier of the CRF Collection. It is a unique reference, see OID Naming Convention |
| Name | Name of the Collection. This name is used in the CRF Tree and in the CRF Viewer pages |
| Effective | Starting date of the CRF Collection. Nobody can use it before this date |
| Obsolete | Ending date of the CRF Collection. Nobody can use it after this date |
| Version | Version of the CRF Collection. Start as 0.1. The x.0 refers to a Final version |
| Status | Version status of the CRF Collection:[Draft|Final|Retired] |
# Add CRF Collection
To add a CRF Collection click on the Add button. A popup is opened with the following metadata:
| Field | Description |
|---|---|
| Name | Provide the name of the CRF Collection that will be displayed in the different part of the application (Mandatory field) |
| OID | Specify an 'Object Identifier' as a unique ID in the application. As we are defining a CRF Collection, it could starts with T.XXX. See OID Naming Convention. This is not an ODM element but we are using it here to group Forms, Item Groups and Items. The field is not mandatory, but if it is left blank then a auto-generated OID is created. |
| Effective | Provide an effective start date, when this CRF Collection will be applicable (select a date in the date-picker) |
| Obsolete | Provide an obsolete stop date (a retired date), when this CRF Collection will be deprecated (select a date in the date-picker) |
Recall in this menu you are creating a building block and the CRF Collection is a 'container' for a collection of CRFs. Adding Forms to a CRF Collection is done in the CRF tree.
# Forms
In this tab you can manage Forms. The table displays the list of existing Forms as Draft or Final (or Retired). Recall that this is for definition the Form building block. Adding Item Groups to a Form, or adding a Form into a CRF Collection is done in the CRF tree
The table displays the following information for each Form:
| Tab | Description |
|---|---|
| Name | Name of the Form. This name is used in the CRF Tree and in the CRF Viewer pages |
| OID | Display the Object Identifier of the Form. It is a unique reference. The filed is not mandatory, but best practise is to use F.<code>. See OID Naming Convention |
| Description | A free-text description of the Form. Is will be used when displaying the list of Forms in the UI. In addition, this information will be used as the /ODM/FormDef/Description/TranslatedText in the XML view of the Form |
| Design Notes | Notes for the designers of the Form |
| Completion Instructions | Text that will guide the users of the Form on how to enter data |
| Repeating | A form template designed to be completed multiple times during a study. Use for data that occurs repeatedly, such as Vital Signs (measured at each visit) or Adverse Events (recorded as they occur). In the CRF Tree this will be indicated by . Examples: Repeating Form: Vital Signs form (completed at screening, baseline, week 4, etc.) Non-repeating Form: Informed Consent (completed once at study entry) |
| Version | Version of the Form. Start as 0.1. The x.0 refers to a Final version |
| Status | Version status of the Form:[Draft|Final|Retired] |
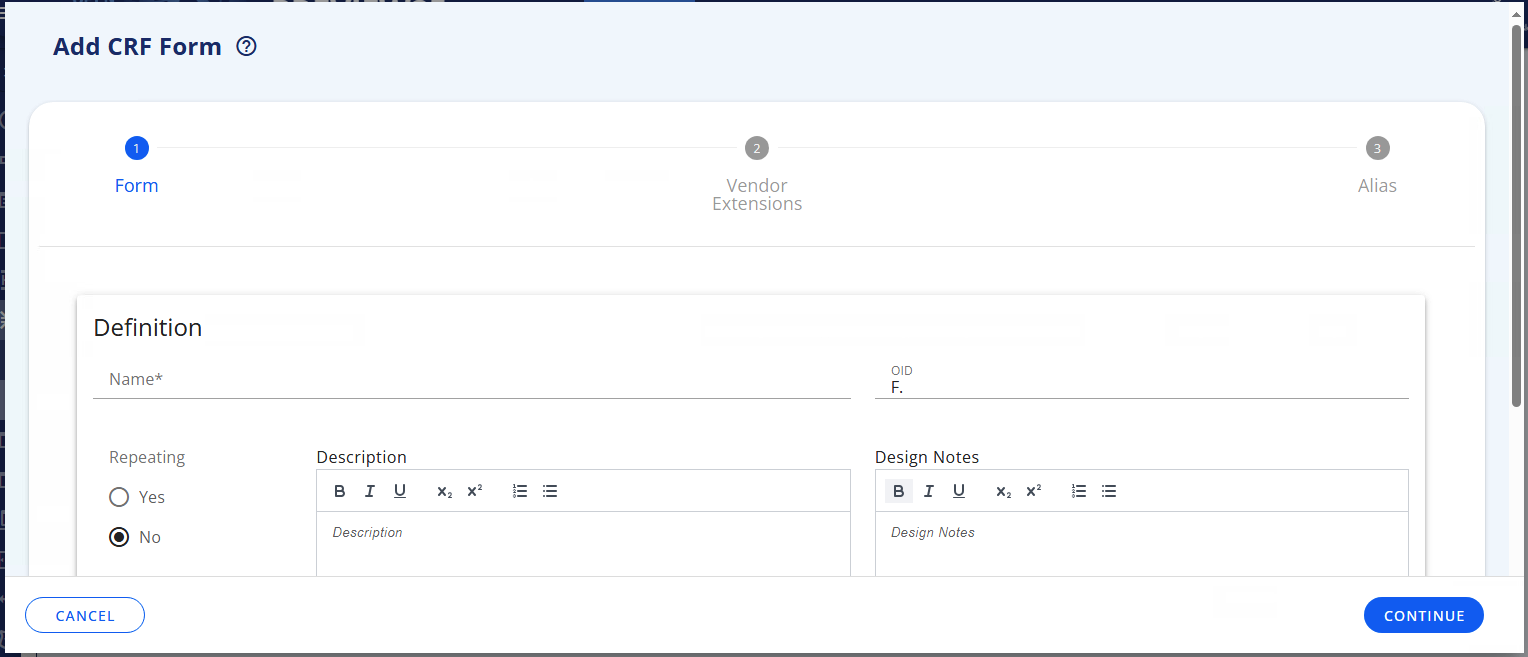
# Add Form
To add a Form click on the Add button, a popup is opened with the following metadata:
| Field | Description |
|---|---|
| Name | Provide the name of the Form that will be displayed in the different part of the application (Mandatory field) |
| OID | Specify an 'Object Identifier' as a unique ID in the application. As we are defining a Form, it starts with F.XXX. See OID Naming Convention. The field is not mandatory, but if it is left blank then a auto-generated OID is created as it is need for the ODM XML format of the Form. |
| Repeating | Indicate if this form can be completed multiple times during the study. Select "Yes" for forms like Vital Signs or Adverse Events that are filled out repeatedly. Select "No" for forms completed once, like Informed Consent or Demographics. In the CRF Tree this will be indicated by . |
| Description | Provide a detailed explanation of the form's purpose and what data it collects. This helps other users understand when and how to use this Form. |
| Design Notes | Add technical notes, design decisions, or implementation guidance for developers and data managers. This field is for internal documentation and is not displayed to study sites. |
| Display text | Enter the text that will appear as the Form title when displayed to users entering data. If left blank, the Name field will be used. |
| Completion Instruction | Provide instructions to guide users on how to complete this Form correctly. These instructions will be visible to data entry staff at clinical sites. Example: "Complete this Form at every scheduled visit" or "Record each adverse event as it occurs." |
| Vendor Extension | Specify any vendor-specific customizations or extensions that apply to this Form. This is used when the Form includes features specific to your EDC system that are not part of standard ODM. Leave blank if not applicable. It will have this indicator in the CRF Tree: |
| Alias | Provide alternative names or codes for this Form used in other systems or contexts. For example, if the Form is known by a different name in your datasets or in source documents. Multiple aliases can be added if needed. |
| Change Description | Document what changes were made if you are creating a new version of an existing Form. Explain what was added, modified, or removed. This creates an audit trail for Form revisions. |
# Item Groups
In this tab you can manage Item Groups. The table displays the list of existing Item Groups as Draft or Final (or Retired). Recall that this is for definition the Item Group building block. Adding Items to an Item Group, or adding an Item Group into a Form is done in the CRF tree
The table display the following information for each Item Group:
| Tab | Description |
|---|---|
| Name | Name of the Item Group. This name is used in the CRF Tree and in the CRF Viewer pages |
| OID | Display the Object Identifier of the Item Group. It is a unique reference. The filed is not mandatory, but best practise is to use G.<code>. See OID Naming Convention |
| Description | A free-text description of the Item Group. Is will be used when displaying the list of Item Groups in the UI. In addition, this information will be used as the /ODM/ItemGroupDef/Description/TranslatedText in the XML view of the Item Group |
| Design Notes | Notes for the designers of the Item Group |
| Completion Instructions | Text that will guide the users of the Item Group on how to enter data |
| Repeating | A section within a Form that can repeat to capture multiple instances of the same type of information. Use for varying quantities of data within a single Form, such as a list of medications or procedures. In the CRF tree this will have this indicator . Repeating Group: For example Medications section within a Medical History form (one row per medication) |
| Version | Version of the Item Group Start as 0.1. The x.0 refers to a Final version |
| Status | Version status of the Item Group:[Draft|Final|Retired] |
# Add Item Group
To add a Item Group click on the Add button, a popup is opened with the following metadata:
| Field | Description |
|---|---|
| Name | Provide the name of the Item Group that will be displayed in the different part of the application (Mandatory field) |
| OID | Specify an 'Object Identifier' as a unique ID in the application. As we are defining an Item Group, it starts with G.XXX. See OID Naming Convention. The field is not mandatory, but if it is left blank then a auto-generated OID is created as it is need for the ODM XML format of the Form using the Item Group. |
| Repeating | Indicate if this section can repeat multiple times within a single form. Select "Yes" for sections like medications lists or procedure records where multiple rows may be needed. Select "No" for sections that appear only once per form. In the CRF Tree this will have this indicator |
| Description | Provide a detailed explanation of what data this Item Group collects and its purpose within the form. This helps users understand the group's role in the overall data structure. |
| Design Notes | Add technical notes, design decisions, or implementation guidance for developers and data managers. This field is for internal documentation and is not displayed to study sites. |
| Display text | Enter the text that will appear as the section heading when displayed to users entering data. If left blank, the Name field will be used. Example: "Concomitant Medications" or "Vital Signs Measurements." |
| Completion Instruction | Provide instructions to guide users on how to complete this section correctly. Example: "Add one row for each medication the subject is currently taking" or "Complete all fields for each measurement timepoint." |
| Domain | Specify the SDTM domain this Item Group maps to (e.g., VS for Vital Signs, CM for Concomitant Medications, AE for Adverse Events). This links the CRF structure to the SDTM datasets. Select from the drop-down. |
| SAS Dataset Name | Enter the name of the SAS dataset that will be created from this Item Group's data. Typically matches the Domain (e.g., VS, DM, AE) but may differ for custom datasets. |
| Is Referential Data | Indicate if this group contains reference data that links to other data in the study (e.g., a subject ID that references the Demographics data). Select "Yes" if this group establishes relationships between datasets. |
| Origin | Specify where the data in this Item Group comes from. Common values: "CRF" (collected on the case report form), "Derived" (calculated from other data), "Assigned" (system-generated), or "Predecessor" (from prior studies). Select from the dropdown, see Origin Values. |
| Purpose | Describe the analytical or operational purpose of this Item Group. Examples: "Tabulation" (for SDTM datasets), "Analysis" (for ADaM datasets), "Operational" (for study conduct), or "Other" |
| Comment | Add any additional notes, clarifications, or context about this group that don't fit in other fields. This is a free-text field for supplementary information. |
| Vendor Extension | Specify any vendor-specific customizations or extensions that apply to this Item Group. Used when the Item Group includes features specific to your EDC system that are not part of standard ODM. Leave blank if not applicable. It will have this indicator in the CRF Tree: |
| Alias | Provide alternative names or codes for this Item Group used in other systems or contexts. For example, dataset names, legacy system identifiers, or alternative terminology used in documentation. |
| Change Description | Document what changes were made if you are creating a new version of an existing Item Group. Explain what was added, modified, or removed to maintain an audit trail of revisions. |
Origin Values:
| Origin | Use When Data Is... |
|---|---|
| Assigned Value | System-generated (IDs, codes) |
| Collected Value | Entered on the CRF by site staff |
| Copied Value | Copied from another dataset |
| Derived Value | Calculated from other data |
| Not Available | Missing but should exist |
| Protocol Value | Defined in the study protocol |
| Other | From non-standard sources |
# Items
In this tab you can manage Items. The table displays the list of existing Items as Draft or Final (or Retired). Recall that this is for definition the Item building block. Adding an Item to a Item Group is done in the CRF tree
The table display the following information for each Item:
| Tab | Description |
|---|---|
| OID | Display the Object Identifier of the Item. It is a unique reference. The filed is not mandatory, but best practise is to use I.<code>. See OID Naming Convention |
| Name | Name of the Item. This name is used in the CRF Tree and in the CRF Viewer pages |
| Description | A free-text description of the Item. Is will be used when displaying the list of Items in the UI. In addition, this information will be used as the /ODM/ItemDef/Description/TranslatedText in the XML view of the Item |
| Design Notes | Notes for the designers of the Item |
| Completion Instructions | Text that will guide the users of the Item on how to enter data |
| Type | The data type of the item |
| Length | The length of the item |
| SDS Var Name | The SDTM variable(s) this item maps to, with optional conditions. Simple mappings show just the variable name (e.g., SUBJID). Conditional mappings include "where" clauses to specify value-level metadata. The syntax is DM:RFICDTC|DS:DSSTDTC|VS:VSTESTCD=SYSBP |
| Version | Version of the Group. Start as 0.1. The x.0 refers to a Final version |
| Status | Version status of the Group:[Draft|Final|Retired] |
# Add Item
To add an Item click on the Add button, a popup is opened with the following metadata:
Note: Some fields appear dynamically based on your Data Type selection. For detailed information about each data type and what additional fields it requires, see the Data Types section.
| Field | Description |
|---|---|
| Name | Provide the name of the Item that will be displayed in the different part of the application (Mandatory field) |
| OID | Specify an 'Object Identifier' as a unique ID in the application. As we are defining an Item, it starts with I.XXX. See OID Naming Convention. The field is not mandatory, but if it is left blank then a auto-generated OID is created as it is need for the ODM XML format of the Item Group using the Item. |
| Data Type | Select the type of data this item will collect (e.g., String, Integer, Date, Float). The data type determines what kind of values can be entered and what validation rules apply. See Data Types for complete list and guidance. |
| Length | Maximum number of characters or digits allowed. This field appears for: String, Text, Integer, and Float data types. |
| Significant Digits | Number of digits after the decimal point. This field appears only when Float data type is selected. |
| Unit | Unit of measurement for numeric values (e.g., kg, mmHg, mg/dL, bpm). This field appears for: Double, Float, hex Float, and Integer data types. |
| Code List | Reference to a controlled terminology or code list that defines allowed values. This field appears when String data type is selected. |
| Code List Subset | A subset of values from a larger code list. This field appears when String data type with code list is selected. |
| Description | Provide a detailed explanation of what data this Item collects and its purpose within the form. This helps users understand the item's role in the overall data structure. |
| Design Notes | Add technical notes, design decisions, or implementation guidance for developers and data managers. This field is for internal documentation and is not displayed to study sites. |
| Display text | Enter the text that will appear as the field label when displayed to users entering data. If left blank, the Name field will be used. Example: "Systolic Blood Pressure (mmHg)" |
| Completion Instruction | Provide instructions to guide users on how to complete this field correctly. Example: "Enter the systolic blood pressure in mmHg" |
| SAS Field Name | The SAS variable name for this item in datasets. Typically matches SDTM variable naming conventions. |
| SDS Var Name | The SDTM variable(s) this item maps to, with optional conditions for value-level metadata. Simple mappings show just the variable name The syntax is DM:RFICDTC|DS:DSSTDTC|VS:VSTESTCD=SYSBP. |
| Origin | Specify where the data in this Item comes from. Select from the dropdown, see Origin Values for descriptions of each option. |
| Comment | Add any additional notes, clarifications, or context about this Item that don't fit in other fields. This is a free-text field for supplementary information. |
| Vendor Extension | Specify any vendor-specific customizations or extensions that apply to this Item. Used when the Item includes features specific to your EDC system that are not part of standard ODM. Leave blank if not applicable. It will have this indicator in the CRF Tree: |
| Alias | Provide alternative names or codes for this Item used in other systems or contexts. For example, legacy system identifiers, or alternative terminology used in documentation. |
| Change Description | Document what changes were made if you are creating a new version of an existing Item. Explain what was added, modified, or removed to maintain an audit trail of revisions. |
# CRF Tree
The CRF Tree is the UI where you combine the elements, so add forms into a Collection, add Item Groups into a Form, add Items to an Item Group.
Throughout the CRF Tree UI you will see then following buttons in the 3-dot context menu:
| Button | Description | Name in User Guide |
|---|---|---|
Opens the definition UI, view or edit detail for each of the elements in Add Form, Add Item Group, and Add Item | Open definition | |
Opens the reference attributes UI. This button will only appear if the elementis in draft. See Reference attributes for more information. | Edit Reference Attributes | |
This will preview the element. This will take you to the CRF Viewer tab for you to view the element | Preview ODM | |
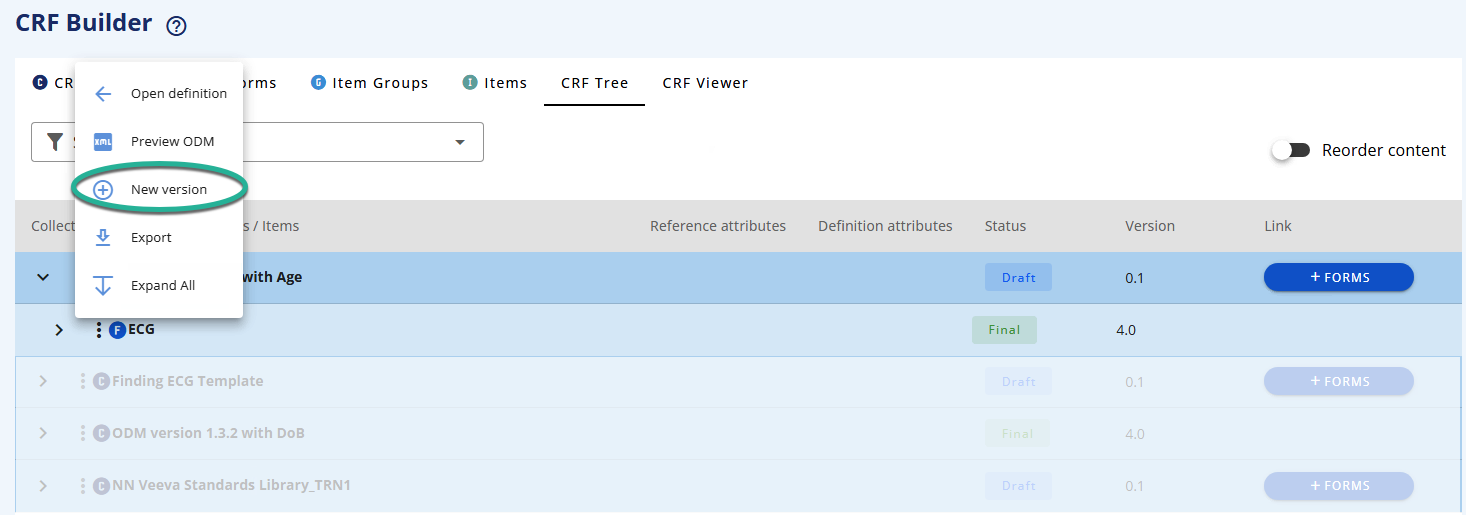
This will create a new version for the element | New version | |
This will create a new version for the element and its sub-components | New version of all child elements | |
You will be able to export the elementin various formats and with or without annotations. | Export | |
| This will expand the CRF tree | Expand All |
# Working with the CRF Tree
Using the CRF Tree, you can mix and assemble the building blocks in any combination to build your data collection structure. This modular approach allows you to:
- Reuse Items and Item Groups across multiple Forms
- Build consistent data structures
- Modify individual components without rebuilding entire CRFs
- Create complex hierarchies from simple building blocks
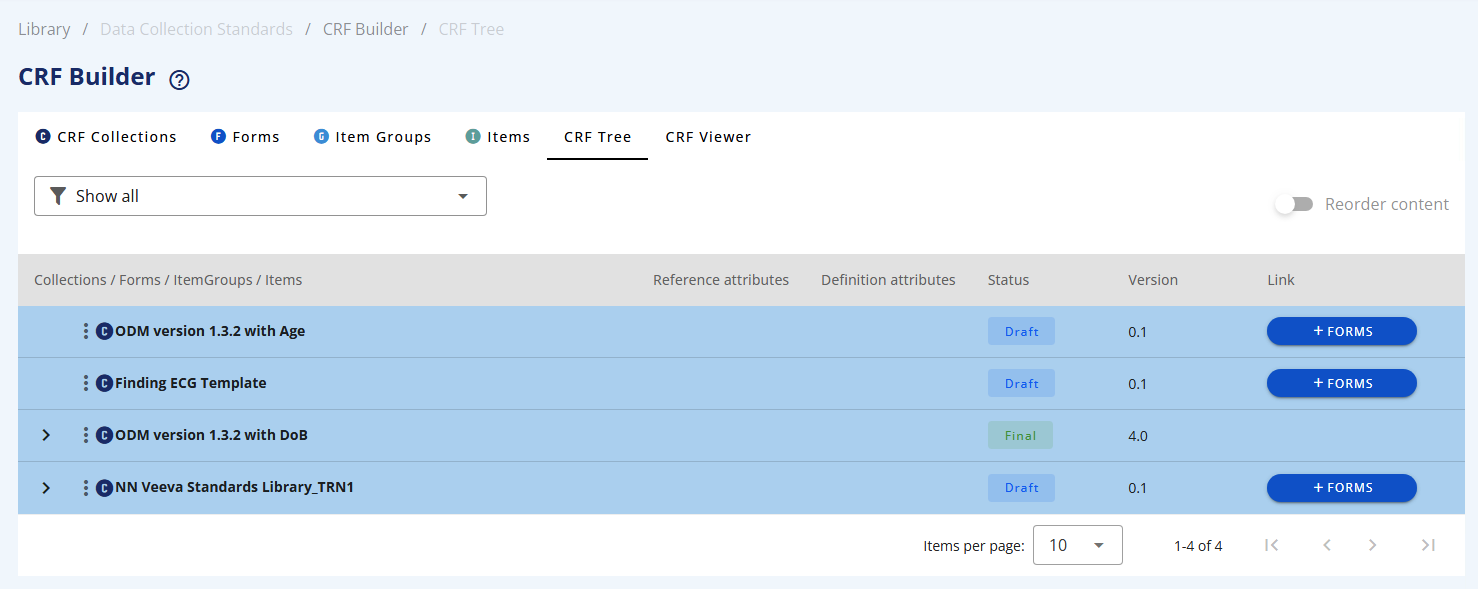
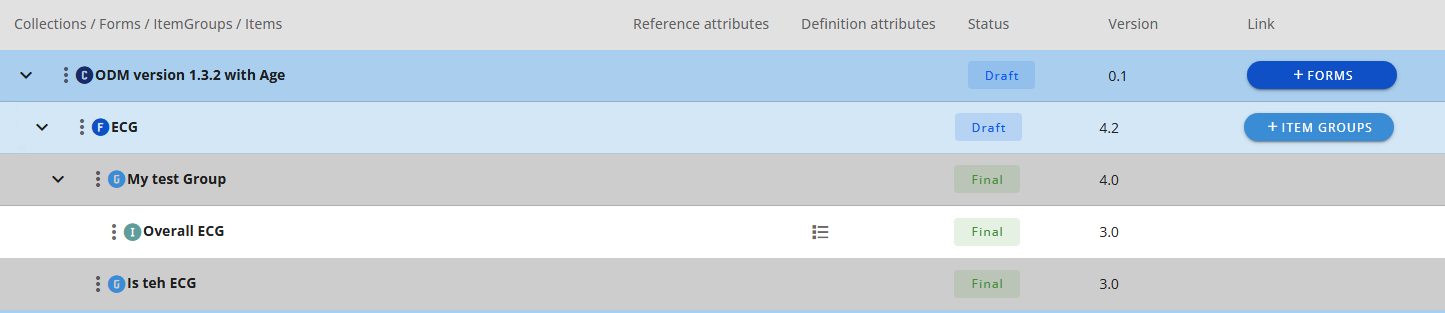
Once you define a CRF Collection it will appear in this tree view. You can filter on a specific CRF Collection using the drop-down.
To add a Form click on the +Forms button.
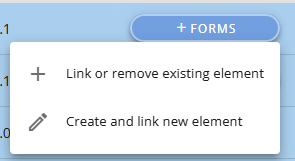
You can now either link to a Form already defined (note this is the latest version displayed)
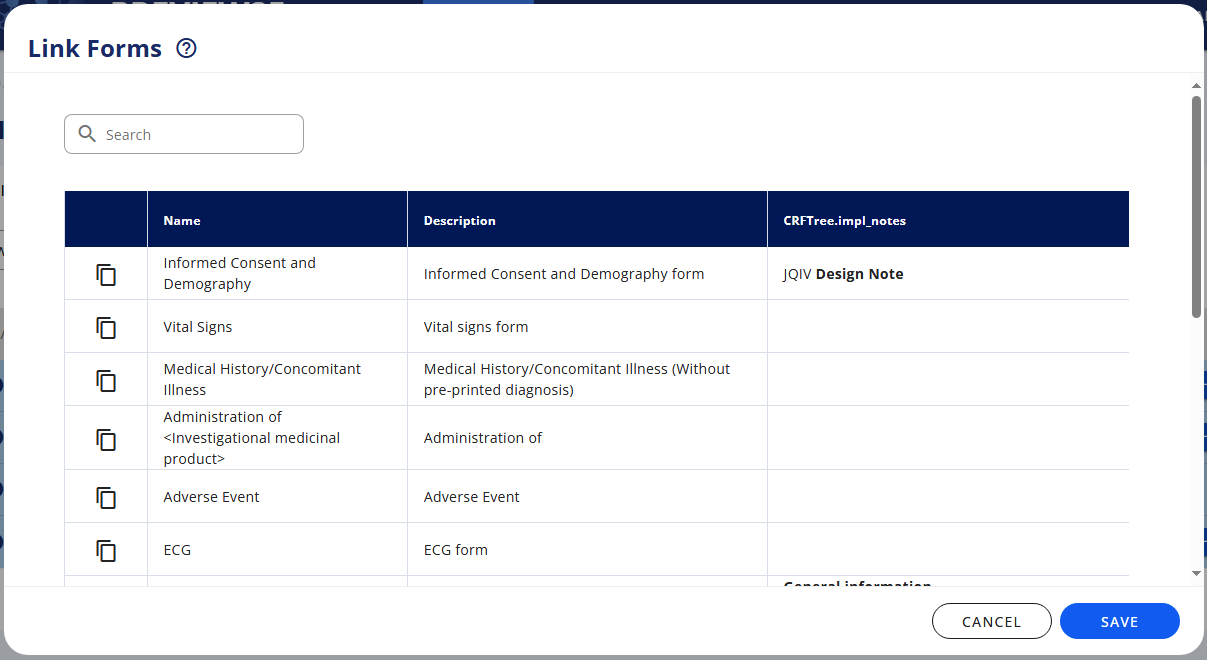
or make a new one (see section Forms)
If the Form has been defined already (in another CRF Collection) then the Form and its Item Groups and Items will be displayed. It will add the latest version of the Form. If the latest version is a Final version and you need to alter the Form then you need to make a new version.
If the Form is used in another CRF Collection which is in draft then you will get a warning (see How Versioning Protects Your Data).
If the other CRF Collection was in Final state then a new version of Form is created (not affecting the other collection). You can see the new draft Form in the Form tab.
From the CRF Tree, if a draft Form has been added, you now are able to add an Item Group. To add an Item Group click on the +Item Groups button.

Similar with an Item. This can be added when the Item Group is in draft. To add an Item click on the +Item button.
For more information in the versioning of Form, Item Group, and Item, see Section How Versioning Protects Your Data
# Reorder elements
To reorder elements then slide the reorder toggle in the top right corner of the table and use the arrows to re-order.
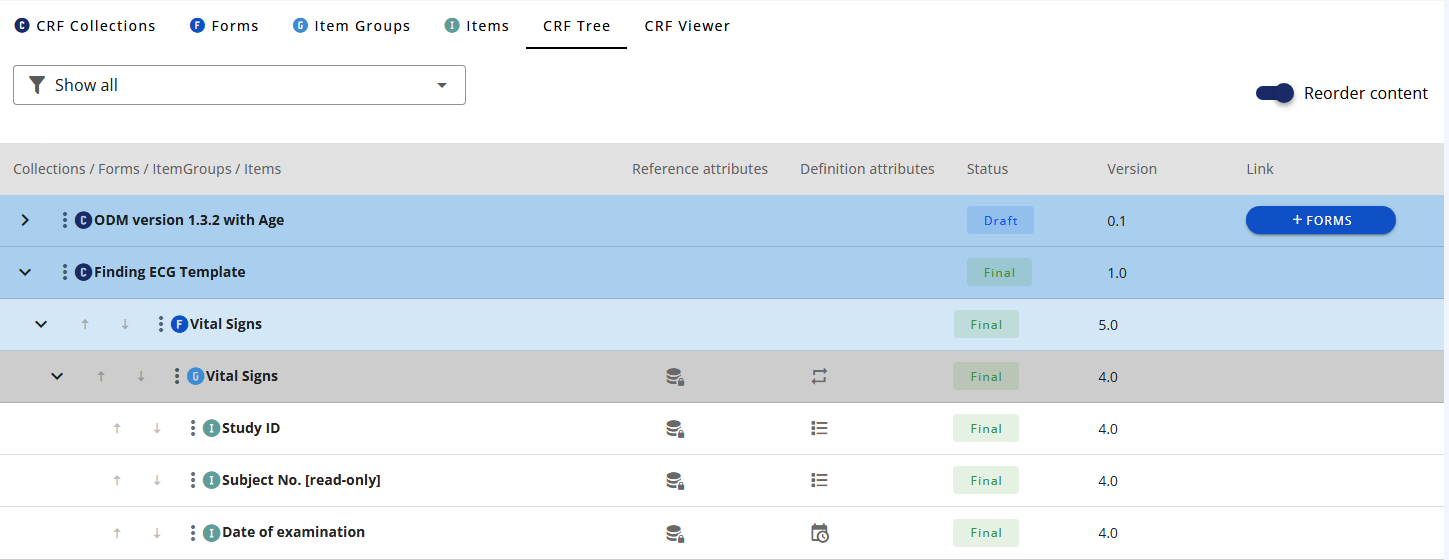
Note to re-order you need to have the CRF Collection and the relevant element (Form, Item GRoupand/or Item) in draft.
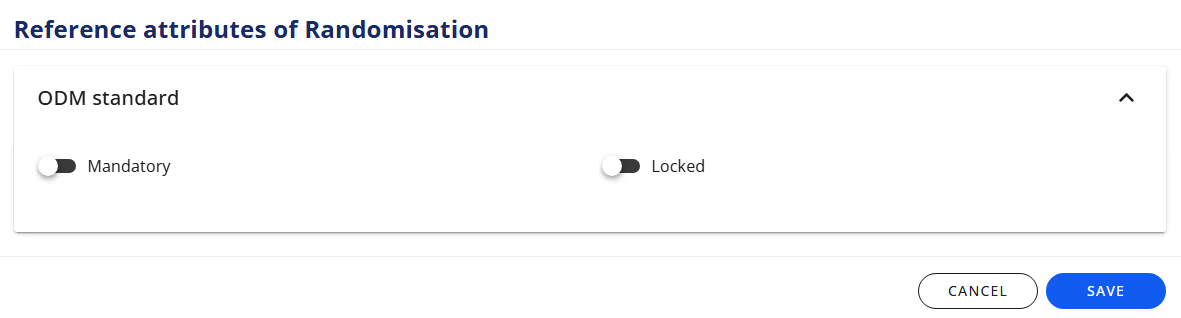
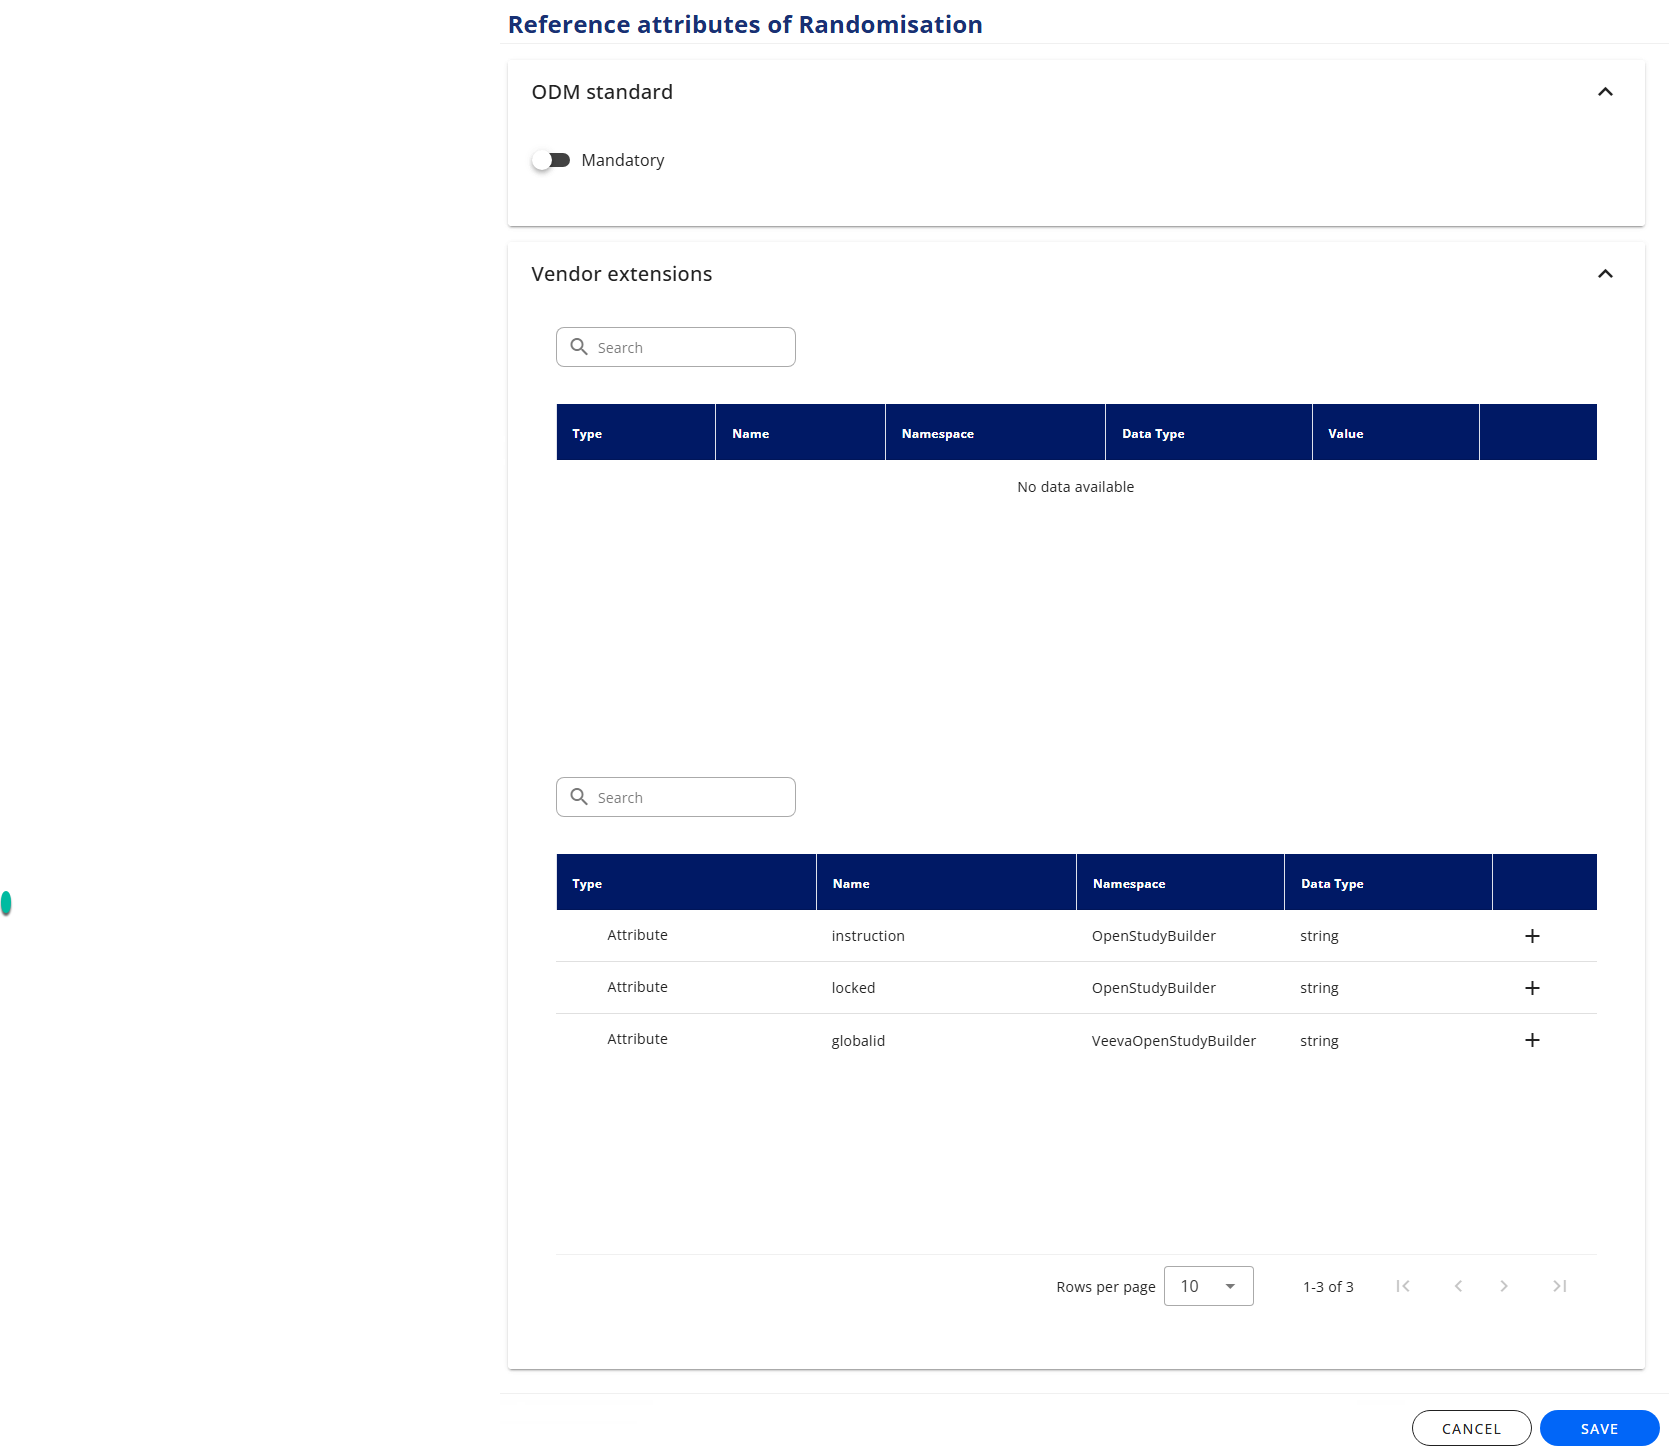
# Reference attributes
On form-level you can specify if the Formis
- mandatory
- locked
On item-group-level and item-level you can specify if the Item Group/Itemis:
- mandatory
- add vendor extension
| Button | Description | Icon - CRF Tree |
|---|---|---|
| Mandatory | The Formis mandatory for the Investigator to complete | |
| Locked | ????? | |
| Vendor Extension | See vendor extension setting in Vendor Extensions, Add Item Group, and Add Item |
# CRF Viewer tab
The CRF Viewer tab lets you preview your assembled structure as it will appear in a CRF.
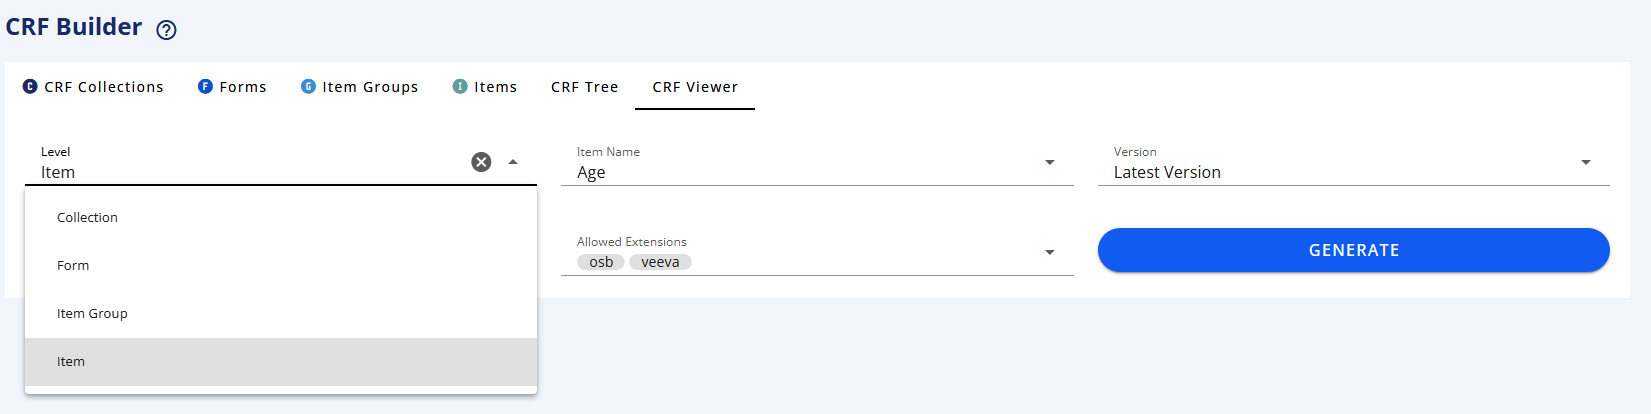
You are able to select a Collection and filter on Forms to subset the view.
In the CRF display you can click on the top-right buttons in the CRF display to view the ODM keys, the SDTM annotations, the Completion instructions and the Design Notes.
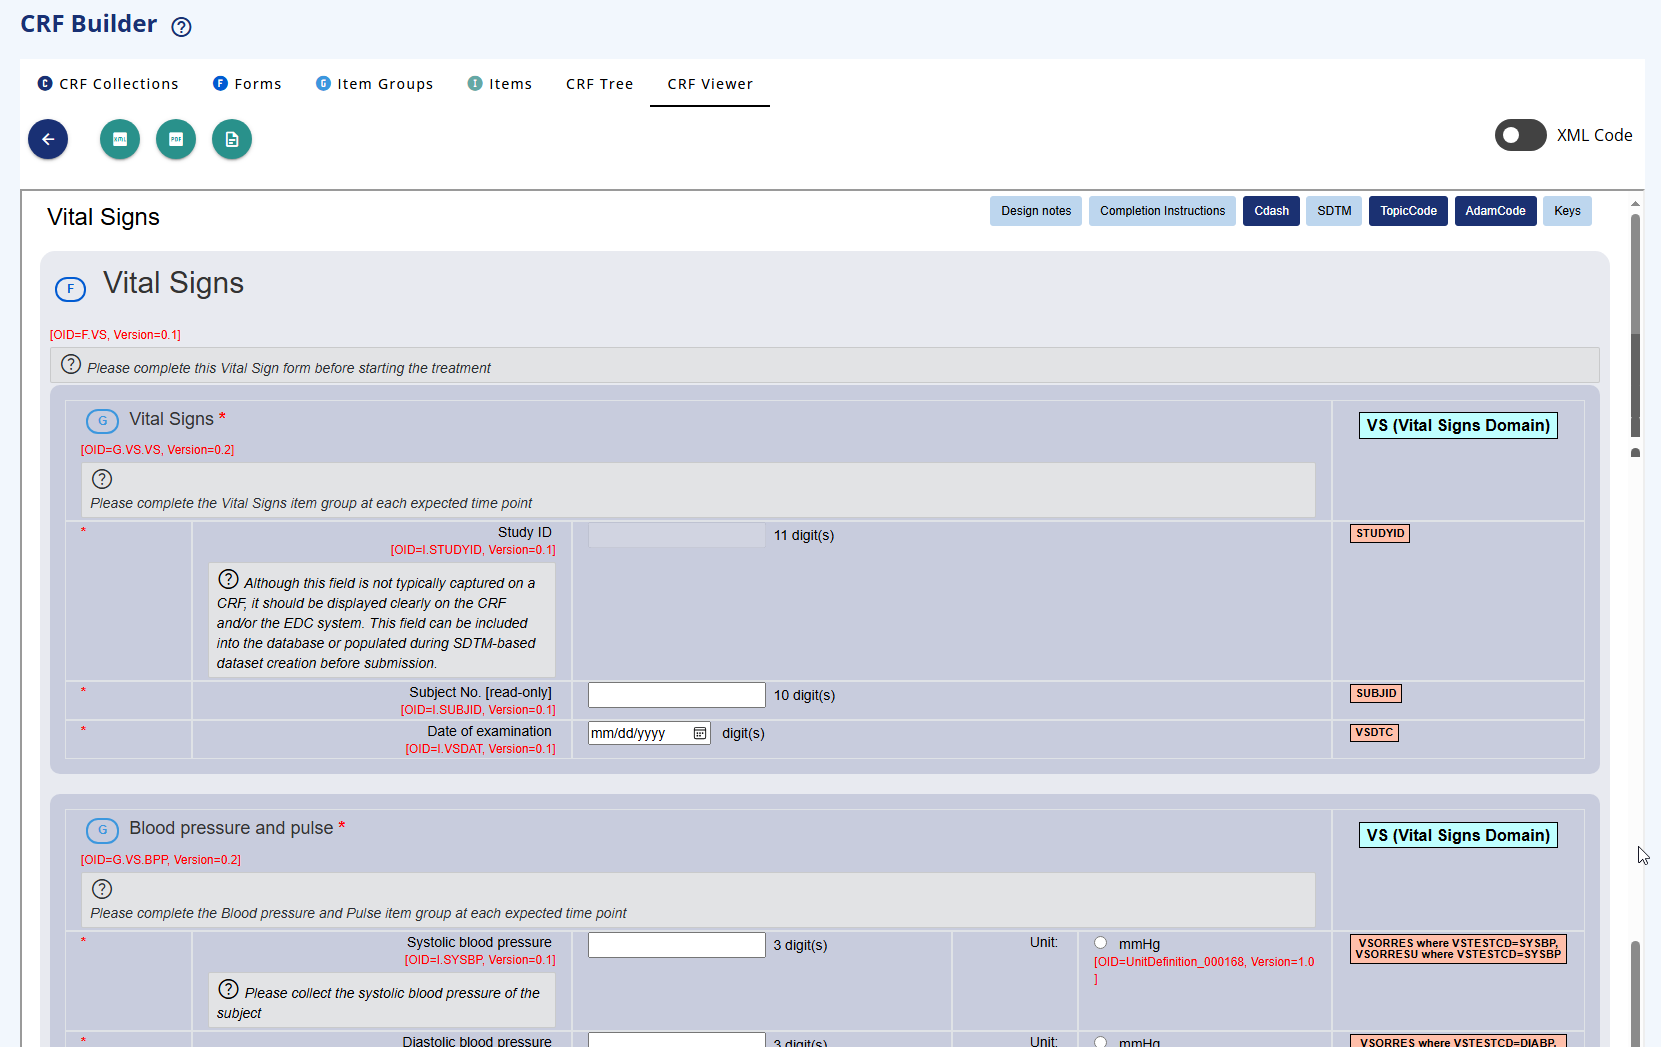
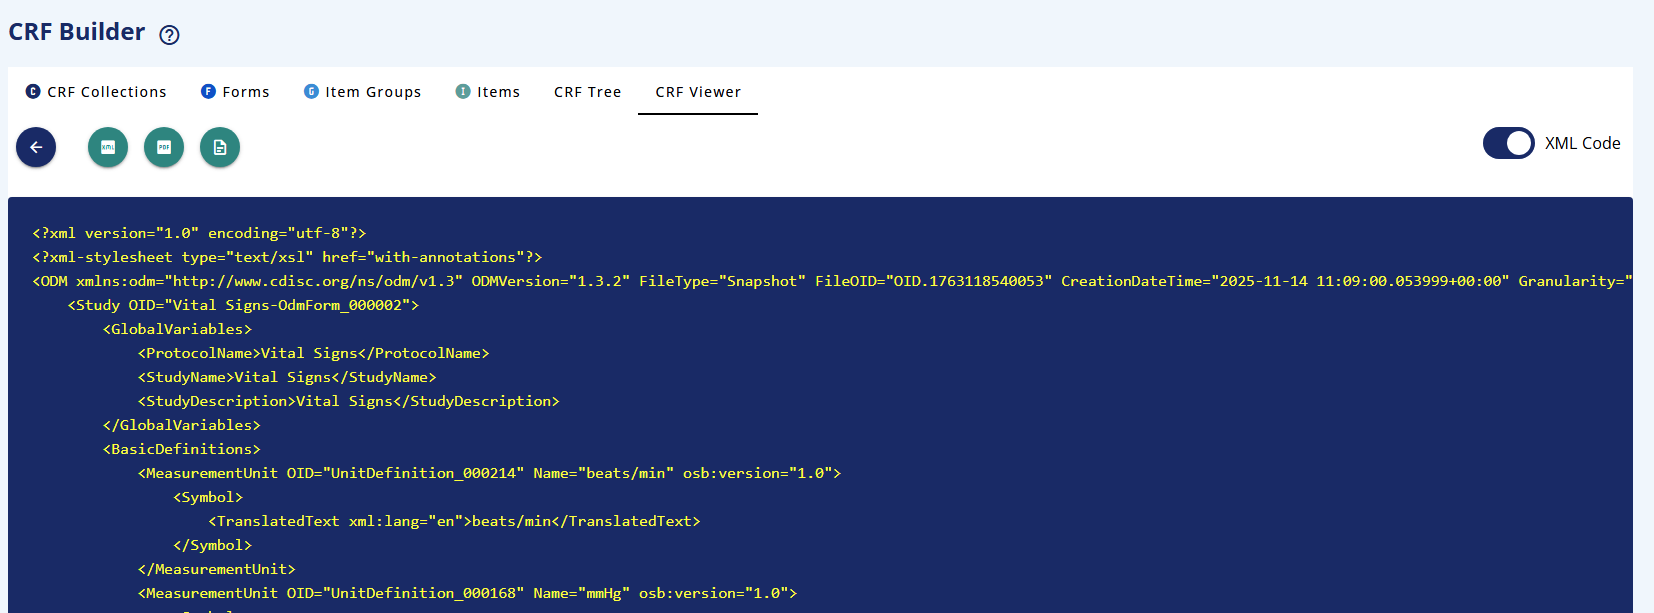
If you slide the XML then you can see the xml version of the element
# Versioning - CRF Tree and Elements
Important: The system automatically uses the latest version of any element when you link it. You cannot select a specific version - this ensures you're always working with the most current definitions.
# Scenario 1: Editing a Draft Element ✅
When an element is in Draft status:
CRF Collection A (Draft) ─┐
                          ├─► Form v0.3 (Draft) ──► Editable
CRF Collection B (Draft) ─┘      (Latest version automatically used)
                                 Changes affect both collections
Result: Direct editing allowed. All collections using this draft see the changes immediately.
# Scenario 2: Editing a Final Element (Used in Final Collection) ✅
When an element is Final (x.0 version) and used in a Final collection:
Before:
CRF Collection A (Final) ──► Form v1.0 (Final) ──► Locked
                             (Latest version = v1.0)
CRF Collection B (Draft) ──┘
Click "New (Form) Version" →
After:
CRF Collection A (Final) ──► Form v1.0 (Final) ──► Unchanged ✓
                             (Still locked to v1.0)
CRF Collection B (Draft) ──► Form v1.1 (Draft) ──► Now editable
                             (Automatically uses new latest version v1.1)
Result: New draft version (v1.1) created automatically. Collection A remains locked to v1.0. Collection B automatically switches to the new latest version v1.1.
# Scenario 3: Editing a Final Element (Used in Draft Collection) ⚠️
When an element is Final (x.0 version) and used in another Draft collection:
Before:
CRF Collection A (Draft) ─┐
                          ├─► Form v1.0 (Final)
CRF Collection B (Draft) ─┘     (Both use latest version = v1.0)
Click "New (Form) Version" → Warning appears:
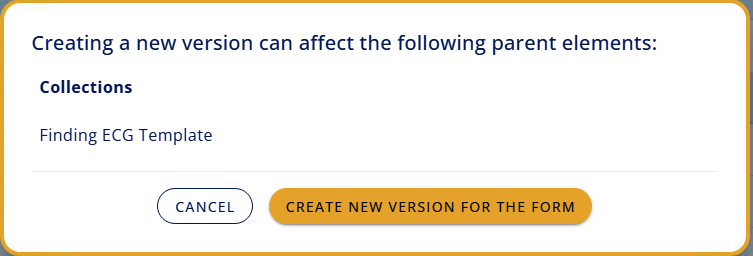
Why the warning? Collection A is also using this form. Since the system always uses the latest version, creating v1.1 will automatically update Collection A as well.
After creating new version:
CRF Collection A (Draft) ─┐
                          ├─► Form v2.1 (Draft)
CRF Collection B (Draft) ─┘     (Latest version = v2.1)

Both collections automatically use new latest version
Result: New draft version (v1.1) created. Both draft collections automatically switch to v1.1 since it's now the latest version. This is why the warning appears - to alert you that another draft collection will be affected.
Key Point: You cannot keep Collection A on v1.0 while Collection B uses v1.1. Draft collections always use the latest available version automatically.
# Version Numbering Rules
| Version Format | Status | Example | When Used |
|---|---|---|---|
| x.0 | Final | 1.0, 2.0, 3.0 | Approved, locked versions |
| x.1, x.2, x.3... | Draft | 0.1, 0.2, 1.1, 2.3 | Work in progress, editable |
Progression example:
Start with draft:  0.1 (Draft) → 0.2 (Draft)
Finalize:          → 1.0 (Final)
New changes:       → 1.1 (Draft) → 1.2 (Draft)
Finalize again:    → 2.0 (Final)
# Approval in the CRF Tree
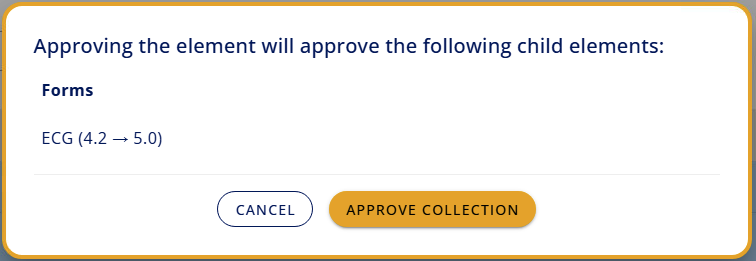
When you approve a CRF Collection in the CRF Tree you will also approve the child elements
You are get a notification of the child elements being approved
# New version of CRF Collection
If you have a final CRF Collection you can either choose to make a new version for all the child elements or just make a new version of the CRF Collection element itself.
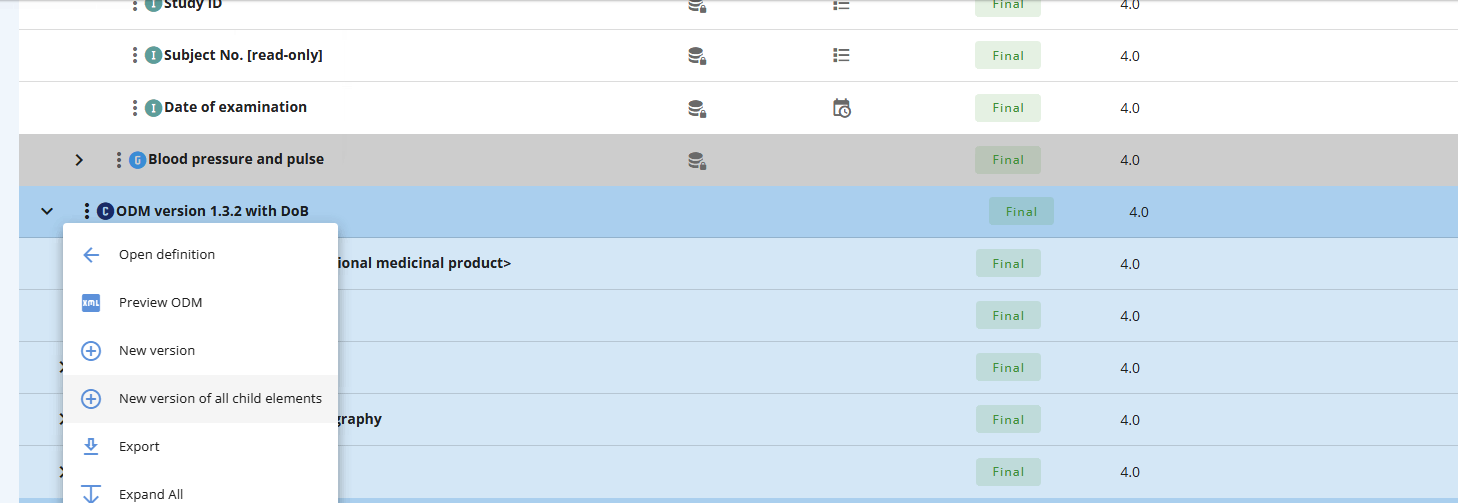
Note that if you want to add a Form to the CRF Collection then only make a new version of the CRF Collection - not all the child elements. Putting the CRF Collection in draft will make the +Forms button appear.
# Important Version Management Rules
Rule 1: Latest version always used
- When you link an element, the system automatically uses its latest version
- You cannot select a specific older version
- This ensures consistency across your data collection structures
Rule 2: Draft elements are always editable
- Version numbers like 0.1, 0.2, 1.1, 2.3
- Changes immediately visible in all collections using this draft
- All draft collections automatically see updates
Rule 3: Final elements are locked
- Version numbers like 1.0, 2.0, 3.0
- Cannot be modified directly
- Click "New Version" to create editable draft (becomes next x.1 version)
Rule 4: Final collections are protected
- Final collections lock in the specific versions they used at finalization
- They do NOT automatically update to newer versions
- Remains stable even when new versions are created
Rule 5: Draft collections automatically update
- Draft collections always use the latest available version
- When a new version is created, all draft collections switch to it automatically
- This is why you see warnings when other draft collections are affected
# Data Types
When defining an item (field) in your CRF, you must specify the data type that determines what kind of data can be entered. Select the appropriate data type based on the information you're collecting.
# Data Type Reference Table
| Data Type | Description | Additional Fields Required | Icon - CRF tree | Example Use Case |
|---|---|---|---|---|
| BIT | Binary value that can only be 0 or 1 | None | Flag for data verification status (0=not verified, 1=verified) | |
| Base 64 Binary | Base 64 encoded binary data | None | Encoded medical images or documents | |
| Base64 Float | Base 64 encoded floating point number | None | Encoded numeric measurements | |
| Boolean | True/false or yes/no values | None | Serious adverse event flag (Yes/No) | |
| CTTerm | Controlled terminology term from a standard code list | None | MedDRA coded adverse event terms | |
| Comment | Descriptive text used for ODM comments (not data collection) | None | Internal documentation or annotations | |
| Date | Complete date in format yyyy-mm-dd | None | Date of Birth: 1985-03-15, Visit Date: 2024-11-04 | |
| Date Time | Date and time in format yy-mm-dd hh:mm | None | Adverse event onset: 2024-11-04 14:30 | |
| Double | Decimal number with double precision | Unit | Laboratory value with high precision: 12.3456789 mg/dL | |
| Duration Date Time | Length of time expressed as date-time | None | Study duration: P2Y3M (2 years, 3 months) | |
| Float | Decimal number | Unit, Length, Significant digits | Systolic BP: 120.0 mmHg (unit=mmHg, length=5, sig digits=1) | |
| Hex Binary | Hexadecimal binary data | None | Binary data in hexadecimal format | |
| hex Float | Hexadecimal floating point number | Unit | Specialized numeric encoding | |
| Incomplete Date | Partial date (e.g., month and year only) | None | Date of prior surgery: 2020-03 (month and year only) | |
| Incomplete Date Time | Partial date and time | None | Event time: 2024-11 (year and month only) | |
| Incomplete Time | Partial time | None | Approximate dose time: 14:-- (hour known, minutes unknown) | |
| Integer | Whole number | Unit, Length | Age: 45 years (unit=years, length=3), Heart Rate: 72 bpm | |
| Interval Date Time | Time interval between two date-times | None | Treatment period: 2024-01-01/2024-03-31 | |
| Partial Date | Date with some components missing | None | Historical event date: ----06-15 (day and month, year unknown) | |
| Partial Date Time | Date-time with some components missing | None | Approximate event: 2024-03----- (year and month, day unknown) | |
| Partial Time | Time with some components missing | None | Morning dose: --:30 (minutes known, hour unknown) | |
| String | Text with controlled values from a code list | Length, Code list, Code list subset | Sex: "M" (code list: M/F/U), Race (code list with ethnic categories) | |
| Text | Free-form text | Length | Adverse event description: "Patient experienced mild headache" (length=500) | |
| Time | Time in format hh:mm | None | Dose administration time: 08:30, Sample collection: 14:45 | |
| URI | Uniform Resource Identifier (web address) | None | Reference document URL: https://clinicaltrials.gov/study/NCT12345678 |
# Additional Information Fields Explained
| Field | Used With Data Types | Description | Example |
|---|---|---|---|
| Unit | Double, Float, hex Float, Integer | Specify the unit of measurement | Weight field (Float): unit="kg" Heart rate (Integer): unit="bpm" Blood pressure (Integer): unit="mmHg" |
| Length | Float, Integer, String, Text | Maximum number of characters or digits | Subject ID (String): length=10 Comments (Text): length=500 Age (Integer): length=3 |
| Significant digits | Float | Number of digits after decimal point | Temperature (Float): significant digits=1 for 36.5°C Lab value (Float): significant digits=2 for 12.34 mg/dL |
| Code list | String | Reference to controlled terminology | Sex: code list "SEX" containing M, F, U Country: code list "ISO3166" for country codes |
| Code list subset | String | Subset of values from larger code list | Race: subset of comprehensive race code list containing only relevant values for study |
# Common Use Cases and Recommended Data Types
| Use Case | Recommended Data Type | Settings | Example |
|---|---|---|---|
| Subject Identifier | String | Length=10, no code list | SUBJ-12345 |
| Date of Birth | Date | None | 1985-03-15 |
| Sex | String | Length=1, Code list=SEX | M |
| Race | String | Length=50, Code list=RACE | WHITE |
| Visit Date | Date | None | 2024-11-04 |
| Systolic Blood Pressure | Float | Unit=mmHg, Length=5, Sig digits=1 | 120.0 |
| Heart Rate | Integer | Unit=bpm, Length=3 | 72 |
| Weight | Float | Unit=kg, Length=5, Sig digits=1 | 75.5 |
| Temperature | Float | Unit=°C, Length=4, Sig digits=1 | 36.5 |
| AE Description | Text | Length=500 | Patient experienced mild nausea after dose |
| AE Start Date | Date Time | None | 2024-11-04 14:30 |
| Lab Test Code | String | Length=20, Code list=LBTESTCD | GLUC |
| Lab Result | Float | Unit varies, Length=10, Sig digits=2 | 95.50 |
| Prior Surgery Date | Incomplete Date | None | 2020-03 (when exact day unknown) |
| Pregnancy Status | Boolean | None | Yes |
| Concomitant Med Name | String | Length=100, Code list=WHODRUG | ASPIRIN |
# Best Practices
Choose the most specific data type
- ✅ Use Date for dates, not String
- ✅ Use Integer for whole numbers, not String
- ✅ Use Float for decimal measurements
Set appropriate lengths
- Consider maximum realistic values
- Example: Age length=3 (allows up to 999)
- Example: Subject ID length based on your numbering scheme
Use code lists when possible
- String with code list enables validation
- Prevents data entry errors
- Facilitates standardized analysis
Specify units clearly
- Always include units for measurements
- Examples: mmHg, kg, mg/dL, bpm, °C
- Avoids confusion in data interpretation
Consider partial dates for historical data
- Use Incomplete Date or Partial Date when precision may vary
- Common for medical history dates
Use Text sparingly
- Only for truly free-form content
- Set reasonable length limits
- Examples: comments, descriptions, narratives
# Data Type Selection Decision Tree
# OID Naming Convention
In the definition of the different elements includes the option to specify the OID (Object IDentifier). This is an identifier used in CDISC ODM. An OID is a unique code that identifies each component of the data collection form. Every Form, Item Group, and Item has its own OID.
The OID field is not mandatory for you to fill out. If you leave blank it will generate an OID. However it is recommended to specify the OID. Best practise is:
| Element Type | Pattern | Example | Description |
|---|---|---|---|
CRF Collection | T.<code> | T.LIB_A | Collection named Library A |
Form | F.<code> | F.DM | Form for Demographics |
Item Group | IG.<code> | IG.DM | Demographics section |
Item | IT.<variable> | IT.USUBJID | Subject ID field |
# OID Structure Explained
Forms: F.<code>
Prefix F. identifies this as a Form Code typically matches the SDTM domain (e.g., DM, VS, AE) Example: F.VS for Vital Signs form
Item Groups: IG.<code>
Prefix IG. identifies this as an Item Group (section) Code typically matches the associated form or dataset Example: IG.VS for the Vital Signs section
Items: IT.<variable>
Prefix IT. identifies this as an Item (individual field) Variable name follows SDTM/CDASH naming standards Example: IT.VSTESTCD for Vital Signs Test Code
# Examples in Context
Demographics Form:
Collection:     T.LIB_A       (Collection of Forms)
Form:           F.DM          (Demographics)
  Item Group:   IG.DM         (Demographics data)
         Items: IT.USUBJID    (Unique Subject Identifier)
                IT.BRTHDAT    (Date of Birth)
                IT.SEX        (Sex)
                IT.RACE       (Race)
Vital Signs Form:
Collection:     T.LIB_B        (Collection of Forms)
Form:            F.VS          (Vital Signs)
  Item Groups:   IG.VS         (Vital Signs measurements)
          Items: IT.VSTESTCD   (Test Code)
                 IT.VSORRES    (Result)
                 IT.VSORRESU   (Unit)
# Best Practise OID Rules and Requirements
Valid OID characters:
- ✅ Letters (A-Z, a-z)
- ✅ Numbers (0-9)
- ✅ Periods (.)
- ✅ Hyphens (-)
- ✅ Underscores (_)
- ❌ Spaces (use underscore or hyphen instead)
Important rules:
- Uniqueness: Each OID must be unique within its type. The system will ensure that. You will be notified if an OID already exist.
- Stability: Never change an OID once data collection begins
- Case-sensitive:
F.DMandf.dmare different OIDs - Start character: Must begin with a letter or underscore
In the interface:
- You'll usually see the user-friendly Display Name (e.g., "Demographics")
- The technical OID (e.g., "F.DM") appears in detailed views and exports
- When selecting forms in the viewer, you can search by either name or OID
# Vendor Extensions
Vendor Extensions let you add custom information to your CRF elements beyond the standard fields provided by the system. This flexibility allows you to capture specific metadata without changing the core structure of your forms.
To define an extension you need to be an administrator.
For an element (Form, Item Group or Item) you can add pre-defined extensions, see Add Form, Add Item Group and Add Item, respectively.
To add an extension you select from the list and specify the value.

Then when you view the element in the CRF Viewer tab and enable the xml view (see CRF Viewer tab), you can see the extension:
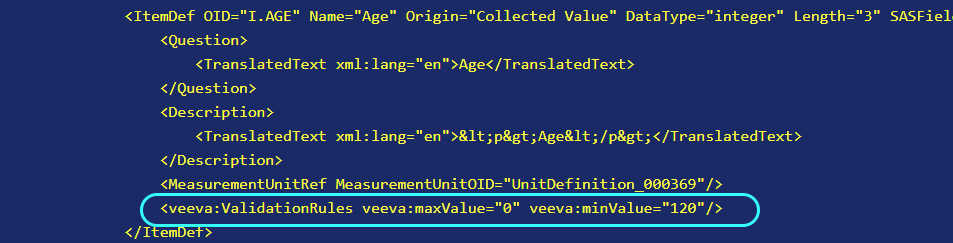
# Common Uses
Vendor Extensions can be used to store for example:
- Custom display or formatting settings
- Internal approval or workflow tracking
- Links to external documentation or systems
- Organization-specific validation rules
- Any other metadata unique to your processes
# How It Works
Each CRF element (Collection, Form, Item Group, or Item) can have multiple Vendor Extensions. You can add custom information in two ways:
Attributes
- Simple key-value pairs that store individual pieces of information directly.
Elements with Attributes
- A named container that can hold multiple related attributes together.
When to Use Each Type:
| Use Attributes | Use Elements with Attributes |
|---|---|
| Single, independent values | Group of related values |
| Simple tracking information | Complex configuration settings |
Example: department="Cardiology", displayColor="#005BD2" | Example: ValidationRules element with minValue="0", maxValue="100", required="true" |
# Glossary
- CRF: Case Report Forms
- ODM: Operational Data Model from CDISC (Standard)
- SDTM: Study Data Tabulation Model from CDISC (Standard)