# Study Activities
# Introduction
One of the main foundations in OpenStudyBuilder is to define the Schedule of Activities (SoA). A Study Activity is the definition of an assessment or procedure performed on a subject.
Defining the SoA consists of several parts and is used for multiple purposes in connected systems and documents, e.g. for the Protocol, CRF specification and SDTM generation. First you select the activities and its grouping for the study, then you select what is to be displayed in the protocol overview of the Schedule of Activity (SoA). You can then define and attach footnotes to the SoA, control the SoA header row and preview the SoA at multiple levels.
The Study Activities menu consists of:
- Study Activities Select the activities to be used in the study (to be further reused in data specifications, data collection specifications, data processing and data analysis). The activities can be selected from the library, from other studies or activity placeholders can be created for requesting new activities.
- Schedule of Activities:
- Detailed SoA Define scheduling of activities by visits, control the level of details to be displayed in the protocol SoA overview table and add footnotes to activities, epochs, visits and collection schedules (the X’s). You also have the option to expand and collapse the view to support navigation as well as downloads in various file formats.
- Protocol SoA Here you can preview the Protocol SoA that can be later exported to protocol template (section 1.2) using OpenStudyBuilder Word ribbon.
- Operational SoA It summarizes all study activities and activity instances and their linkage with visits, displaying corresponding Topic Codes and ADaM Param Codes.
# SoA Settings
On the top of the Study Activities page you can open the SoA Settings form by selecting the settings icon.
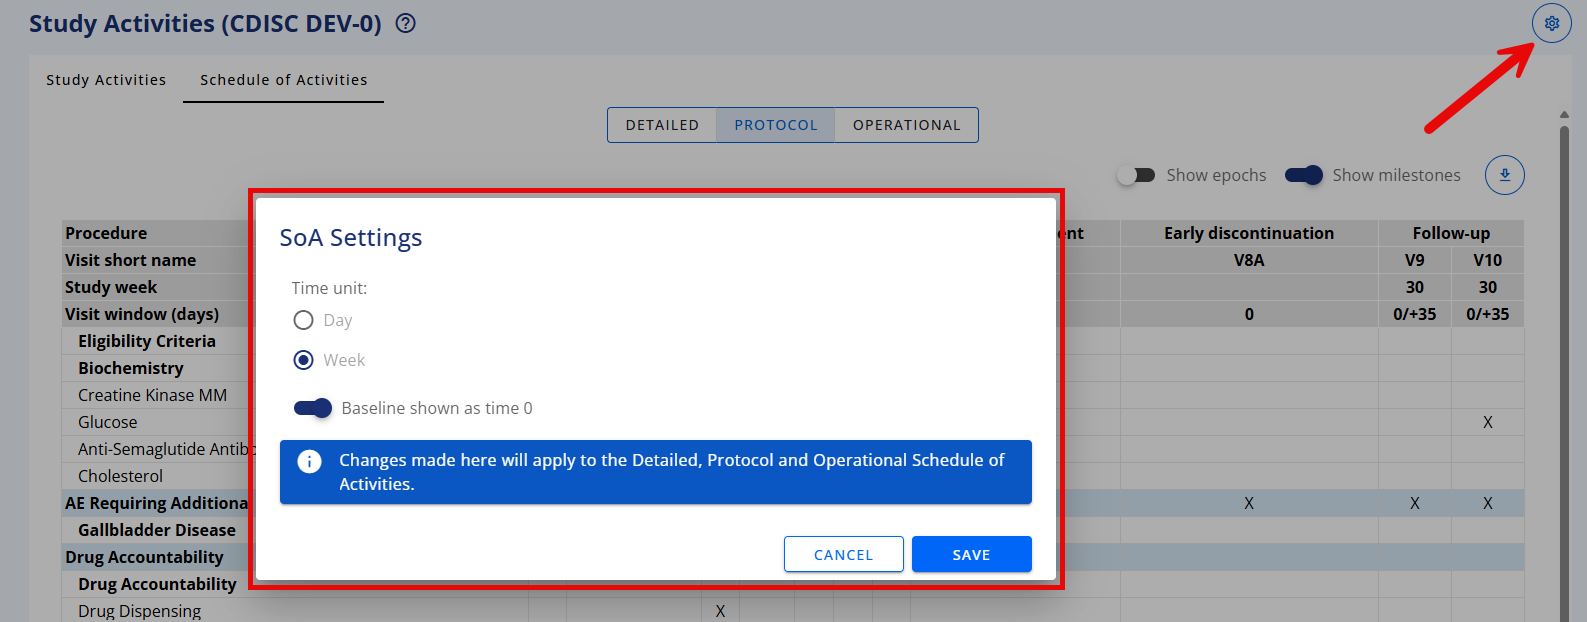
On SoA Settings form you control the time display for the SoA header row. Select to use days or weeks as time unit and select if baseline time is to be shown as time 0 or 1.
If baseline shown as time 0 is selected then the study visit duration time is used in days or weeks, otherwise the study visit day/week count is used.
# Study Activities
Study activities can be added to a study from the library standards, from other studies or they can be added as an activity placeholder that also will act as an activity request.
[](../../../images/user_guides/guide_activities_study activities.png)
In the library definition of an activity, the activity can exist within a possible set of activity groups and activity subgroups, and the display of these groupings can be controlled for the protocol SoA. Unfortunately, the groupings can only be selected when you add an activity to a study, it is currently not possible to change the grouping (this we will change in a coming release).
Beside the activity grouping each study activity will also need to be related to an overall SoA group. This relates to the specific context of the activity in the study and is related to a general code list for SoA groups (i.e. this grouping is not limited to the specific activities.). Values can be like Subject related information, Safety, Efficacy, etc. The selection of SoA group can be changed by editing a study activity.
So for adding study activities you follow steps as below:
- Click the (+) icon on the top right part of the page to open the Add study activities form.
- Select if the study activity is to be added from another study, library standards or to create a placeholder for a new activity request.
- When selecting from other studies, first select the study to copy from (in this case the SoA group will be the same as in this study, but this SoA group selection can be changed in a following edit if needed).
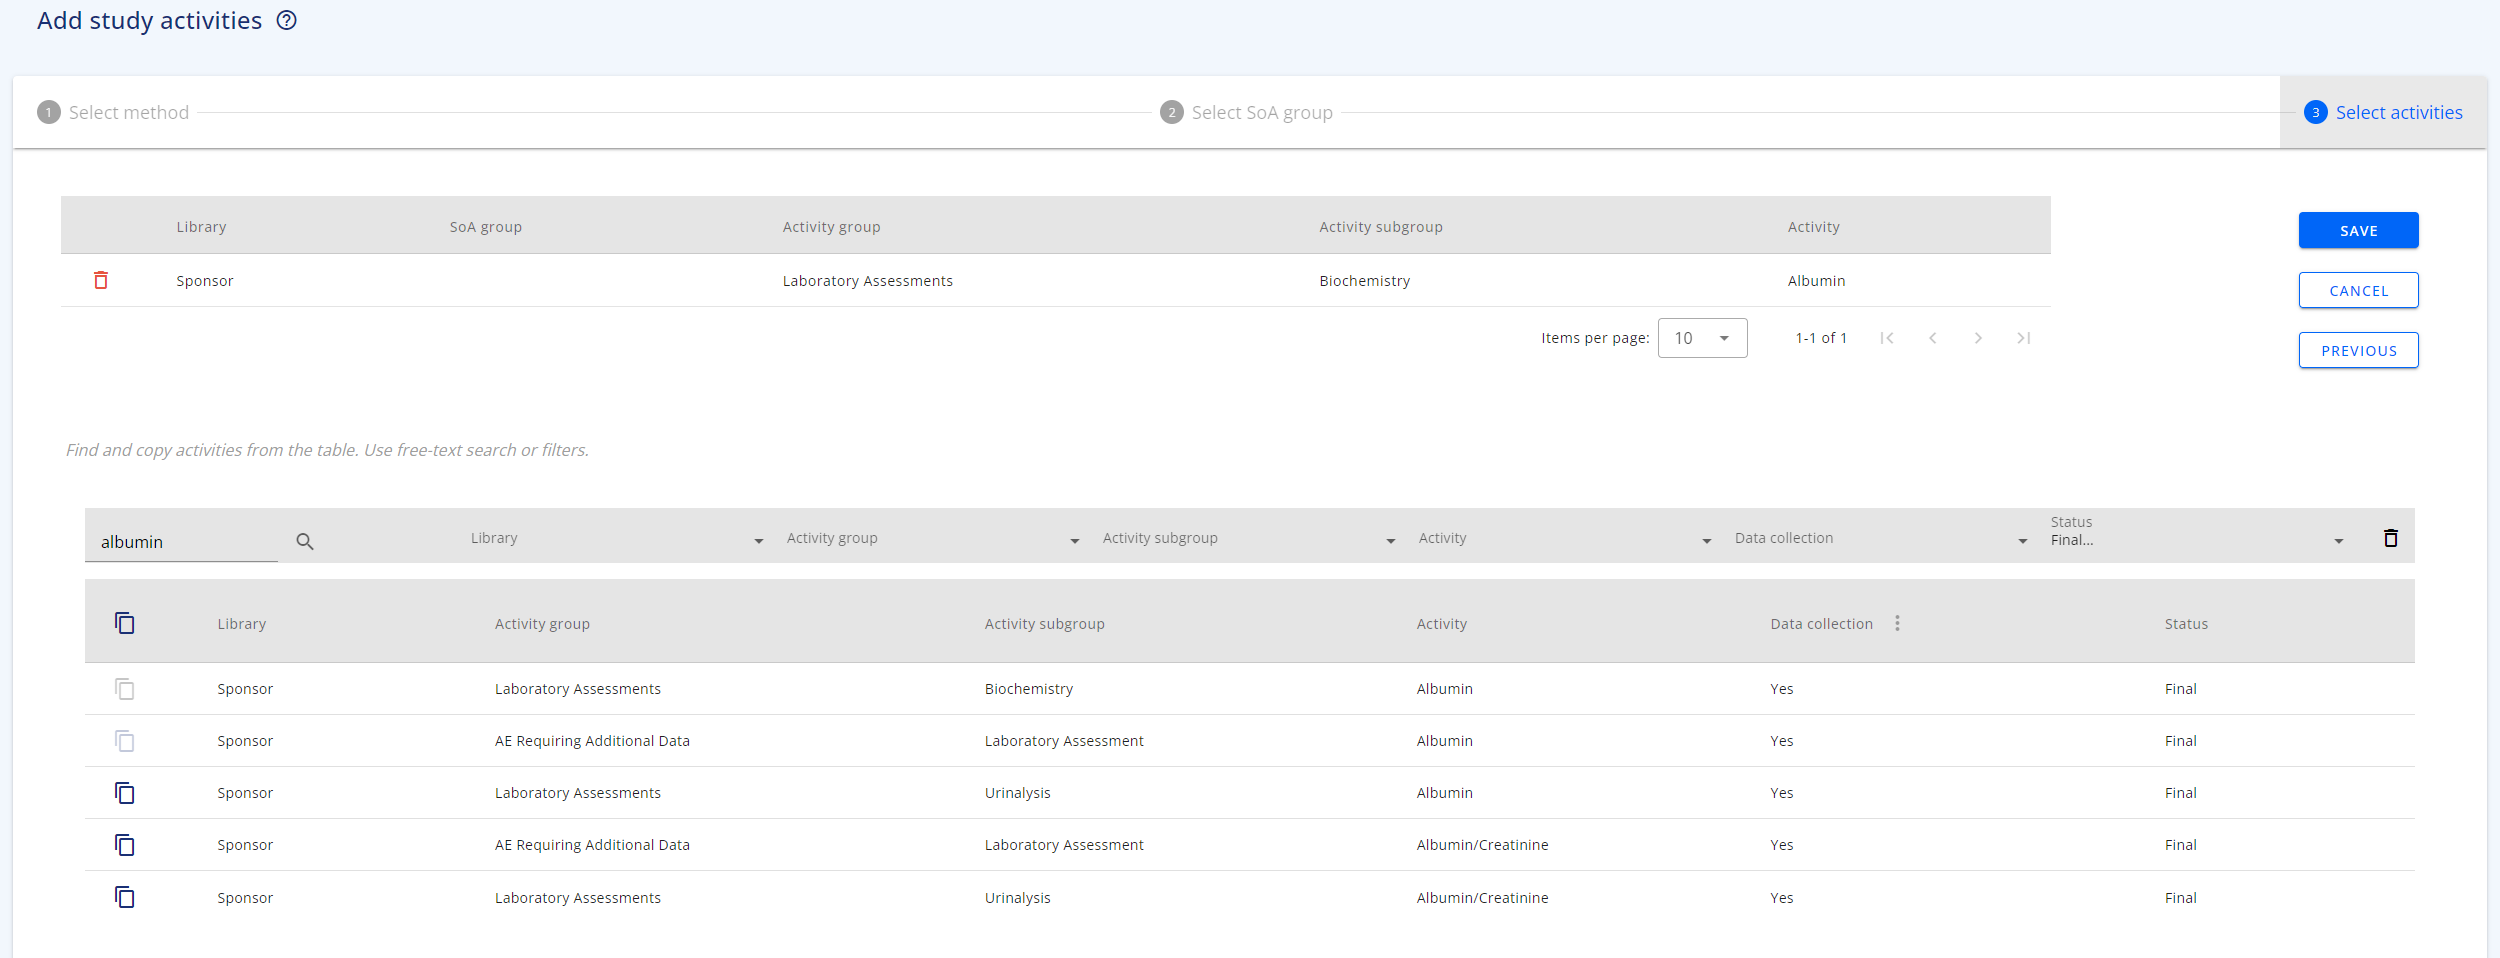
- When selecting from library standards then:
- First select the SoA group
- Then search for the activity to be added from the list of activities in library. You can use free text filtering or column specific filtering.
- Use the 'copy' icon to bring the activity to the list of activities to be added. Note for activities already in the study or on the selection list then the copy icon is grayed out and disabled.
- Click SAVE to complete the selection.
The related SoA group can be modified using the Edit function and the Change order function of study activities can be used to control the order within the grouping.
Note, it is at the moment not possible to edit the grouping of an activity within the possible activity groups and subgroups. To change the order you need to remove the activity and add it again, redefining the collections. This will be changed in a subsequent release.
# Activity Placeholder Requests
How to create, edit, and finalize activity placeholders in your study
What are activity placeholders?
Activity placeholders are temporary names for activities that you want to include in your study, but are not yet defined or approved by the library. For example, you might want to use a new activity called "Vitamin L" in your study, but you are not sure what it entails or how to measure it. You can create an activity placeholder for "Vitamin L" and use it in your study activities and schedule of assessments, without finalizing it. This way, you can plan your study design and timeline without waiting for the library approval.
Activity placeholders are marked as ‘Requested’ in your study activities and schedule of assessments. You can edit or delete them at any time, until you submit them. Submitting a activity placeholder means that you are ready to submit it to the library for approval. Once you submit an activity placeholder, it will appear in the library under the "Requested Activities" tab, where the library users can review, approve, or reject it. You cannot edit a submitted activity placeholder except for the SoA group after you submit it.
How to create an activity placeholder?
To create an activity placeholder, follow these steps:
- Go to the "Study Activities" tab in your study.
- Click on the "Add Activity" button and select Create Placeholder for new Activity Request. Then select Request Activity to immediately submit it to approval or Create a Placeholder Activity if you want to create a placeholder without submitting it for approval.
- Select the most meaningful grouping for the activity placeholder.
- Enter a name for your activity placeholder in the "Activity Name" field. You can use any name that helps you identify the activity, but avoid using names that are too vague. You cannot submit an Activity placeholder Request for an activity that already exists.
- Enter a rationale for your activity placeholder in the "Rationale for Activity Request" field. You can explain why you need this activity, what it measures, and how it relates to your study objectives.
- Click on the "Save" button. Your activity placeholder will be added to your study activities and schedule of assessments and will be highlighted in orange or yellow, depending if the request has been submitted or not.
How to edit or delete an activity placeholder not yet submitted?
To edit or delete an activity placeholder, follow these steps:
- Go to the "Study Activities" tab in your study.
- Find the not yet submitted activity placeholder (orange highlight) that you want to edit or delete. You can use the filter or search function to locate it.
- Click on the three dots next to the activity placeholder name and select "Edit" or "Delete".
- If you click on the "Edit" button, you can modify the name or rationale of the activity placeholder. You can also submit the activity placeholder by changing the "Submit request" slider and send it to the library for approval. Click on the "Save" button to apply your changes.
- If you click on the "Delete" button, you will be asked to confirm your action. Click on the "Yes" button to delete the activity placeholder. It will be removed from your study activities and schedule of assessments.
How to submit an activity placeholder request?
To finalize an activity placeholder, follow these steps:
- Go to the "Study Activities" tab in your study.
- Find the activity placeholder in orange that you want to finalize. You can use the filter or search function to locate it.
- Click on the "Edit" button next to the activity placeholder name.
- Change the "Submit Request" slider to indicate that your activity placeholder is ready for library approval.
- Click on the "Save" button. Your activity placeholder will turn yellow in the study activities list and be sent to the library under the "Requested Activities" tab, where the library users can review, approve, or reject it.
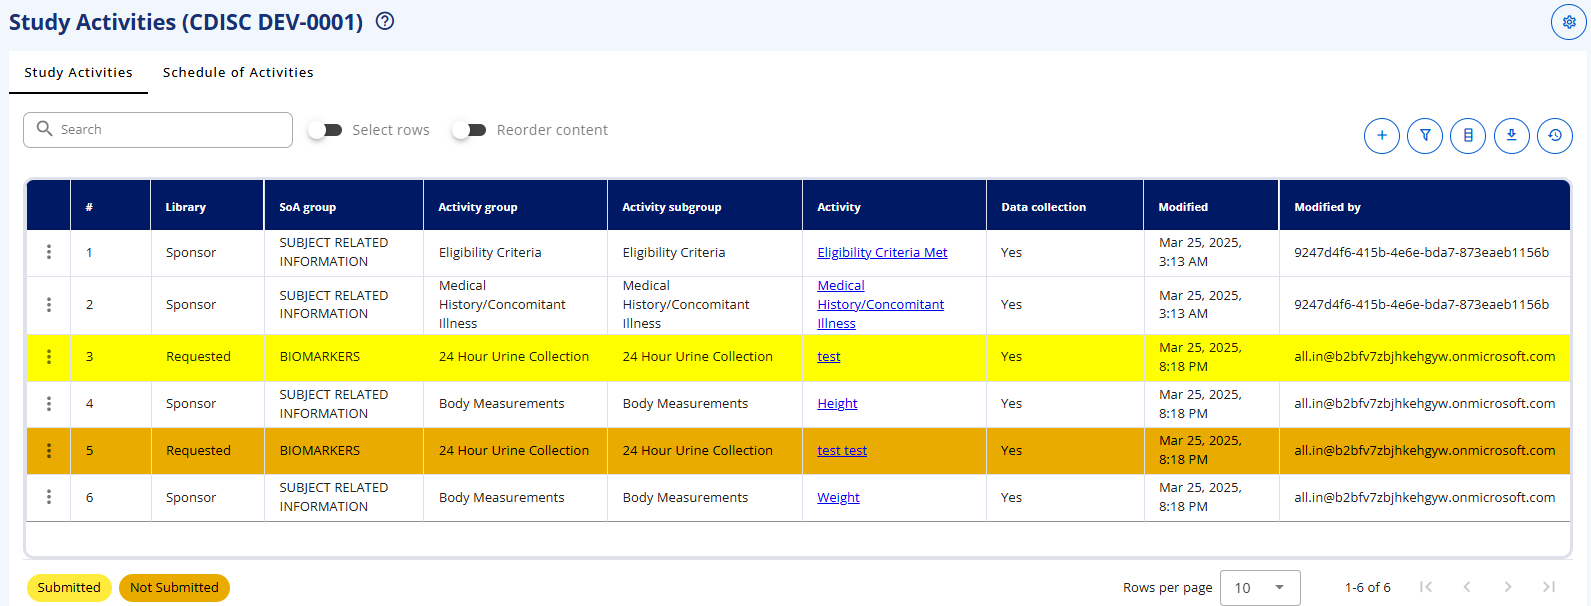
Draft (not submitted) and submitted activity placeholders with legends
How to see if an Activity placeholder Request has been approved?
- Go to the "Study Activities" tab in your study.
- Find the activity placeholder highlighted in yellow that you want to check. You can use the filter or search function to locate it.
- If the activity request has been handled (approved or rejected), then a red exclamation mark will be visible to the left of the row.
- Click on the three dots. If the activity request has been approved, then the first row will state ‘Update to approved activity’. Click on the text and the activity request highlighted in yellow will be updated to the approved activity and highlight will disappear. Note, that the approved activity can differ from what was requested.
How to see if an Activity placeholder Request has been rejected?
- Go to the "Study Activities" tab in your study.
- Find the activity placeholder highlighted in yellow that you want to check. You can use the filter or search function to locate it.
- If the activity request has been handled (approved or rejected), then a red exclamation mark will be visible to the left of the row.
- Click on the three dots. If the activity request has been rejected, then the first row will state ‘Remove not-approved activity and get further information’. Click on the text and a popup box appears with the activity name, the reason for rejection and whom to contact for further information.
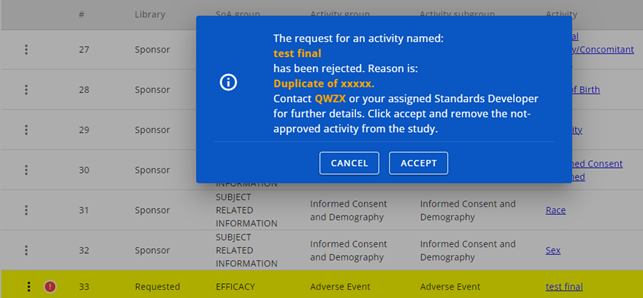
Rejected activity placeholder, reason and contact information
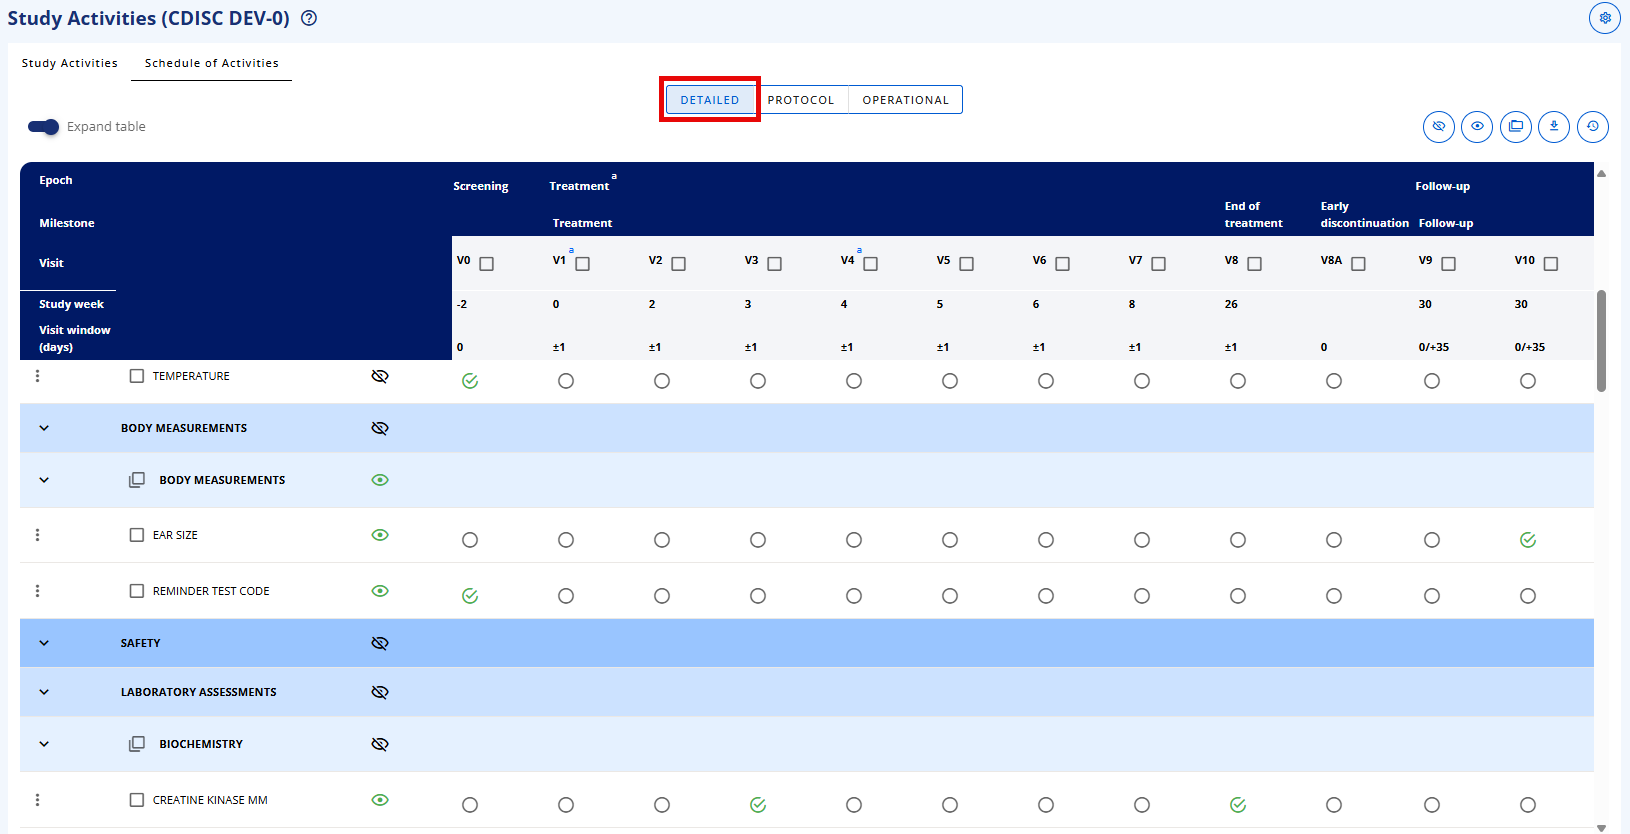
# Detailed SoA
On the Detailed SoA page you define the following:
- Select the scheduling of activities by visits. Simply mark the circle controls in the intersection cells for the activity rows and the visit columns.
- Control the level of details to be displayed in the protocol SoA overview table by simply enabling or disabling the eye icon control for each activity row.
- Add footnotes to activities, epochs, visits and collection schedules (the X’s).
- At the bottom of the page you can see the currently defined footnotes by expanding the SoA footnote box.
- Simply click on the add footnote action icon, and the display will change to the adding footnote mode. In this mode, each SoA item that can refer to a footnote will have a small (+) icon - select these for the locations to which the footnote should be attached. Another option for adding a footnote is by placing the cursor in SoA on the 'X' that links a specific activity with a visit. Then, a small (+) icon will appear next to 'X', which when clicked, will initiate the footnote mode.
- In the same view you can also remove footnotes.
- The footnotes will automatically be assigned a letter from a-z depending on the order in the SoA table from top left to bottom right.
- Complete the footnote assignment by clicking the save icon in the floating 'Select SoA items linked to footnote' window.
You also have the option to expand and collapse the view to support navigation, either by using the Expand table control to expand the full SoA table, or by using the '>' controls to expand individual section.
The page also supports selecting multiple activities using the selection checkboxes.
- Select multiple activity items using selection checkboxes
- Select to display/hide all selected activities by selecting the eye action buttons in the top left row.
- Select scheduling for all selected activities by selecting the batch edit action button in the top left row. On the pop-up you then select the visits the schedules should be for. Note this process will overwrite the current selections.
This page also supports downloads of the SoA data in various file formats.
# SoA Footnotes
SoA Footnotes can be added to a study from the library standards, from other studies or they can be created from scratch.
The SoA footnote text is defined and managed from this page, but are linked to individual SoA items as activities, activity grouping, scheduled collections, visits or epochs on the Detailed SoA page. You can get to the SoA footnote linking page either from editing a footnote from this page or by selecting footnote linkage from the SoA footnote list on the bottom of the Detailed SoA page.
The footnotes will automatically be assigned a letter from a-z depending on the order in the SoA table from top left to bottom right.
# Protocol SoA
On the Protocol SoA page you can preview the SoA at multiple levels, the high-level overview for protocol section 1.2, the detailed view corresponding to definitions in section 8 and appendixes as well as the operational data specification view corresponding to the expected data in SDTM and ADaM.
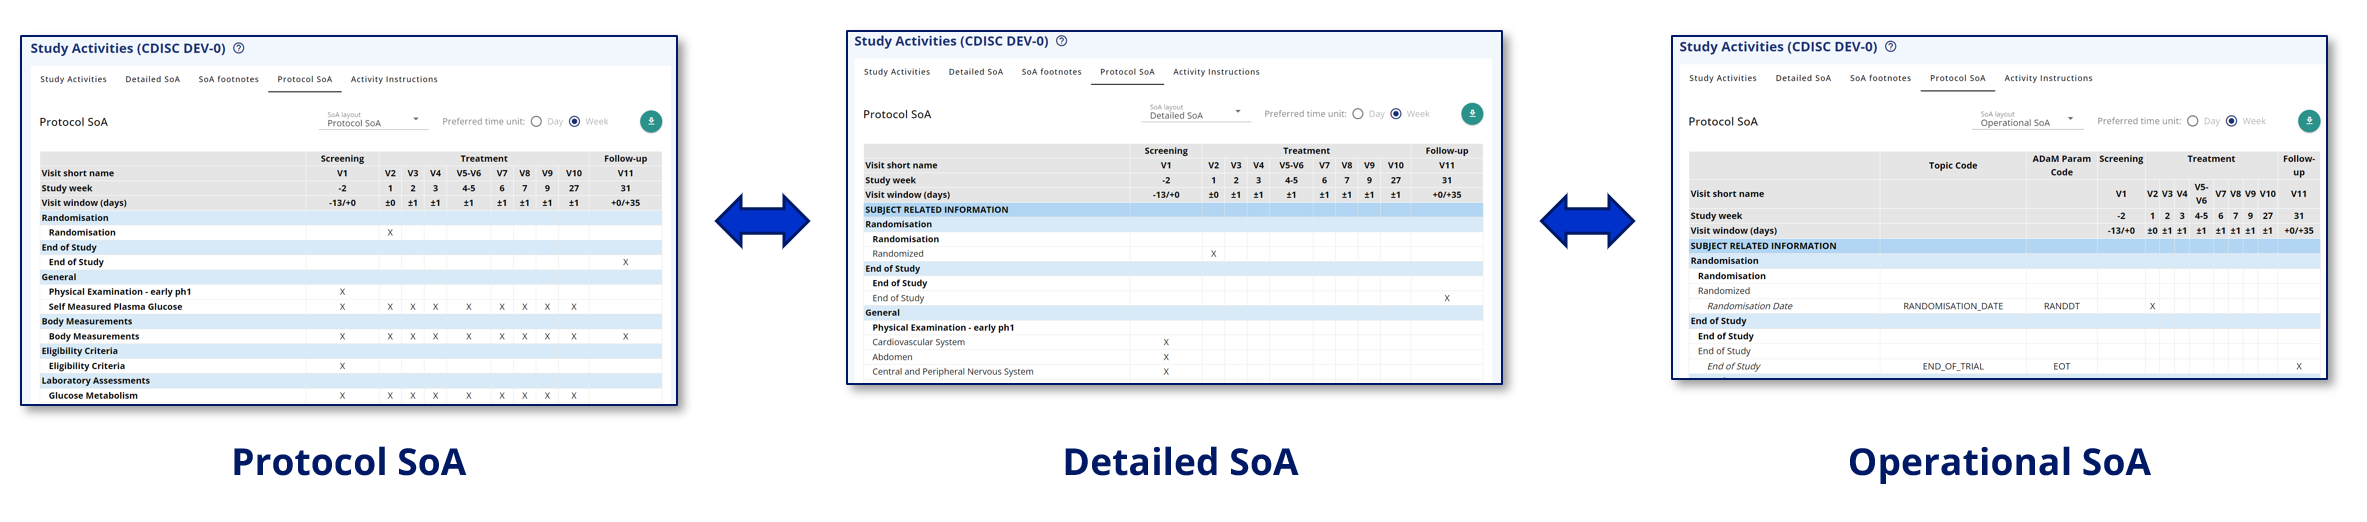
Protocol SoA
- For the high level SoA in protocol section 1.2.
- Main purpose is for the investigator and site staff to get an overview of the operational schedule.
Detailed SoA
- Specifying the semantic data observations to be collected in the study – but not specific to representation in ADaM, SDTM or data collection.
- Will be part of protocol section 8 and appendixes or other supplementary documents.
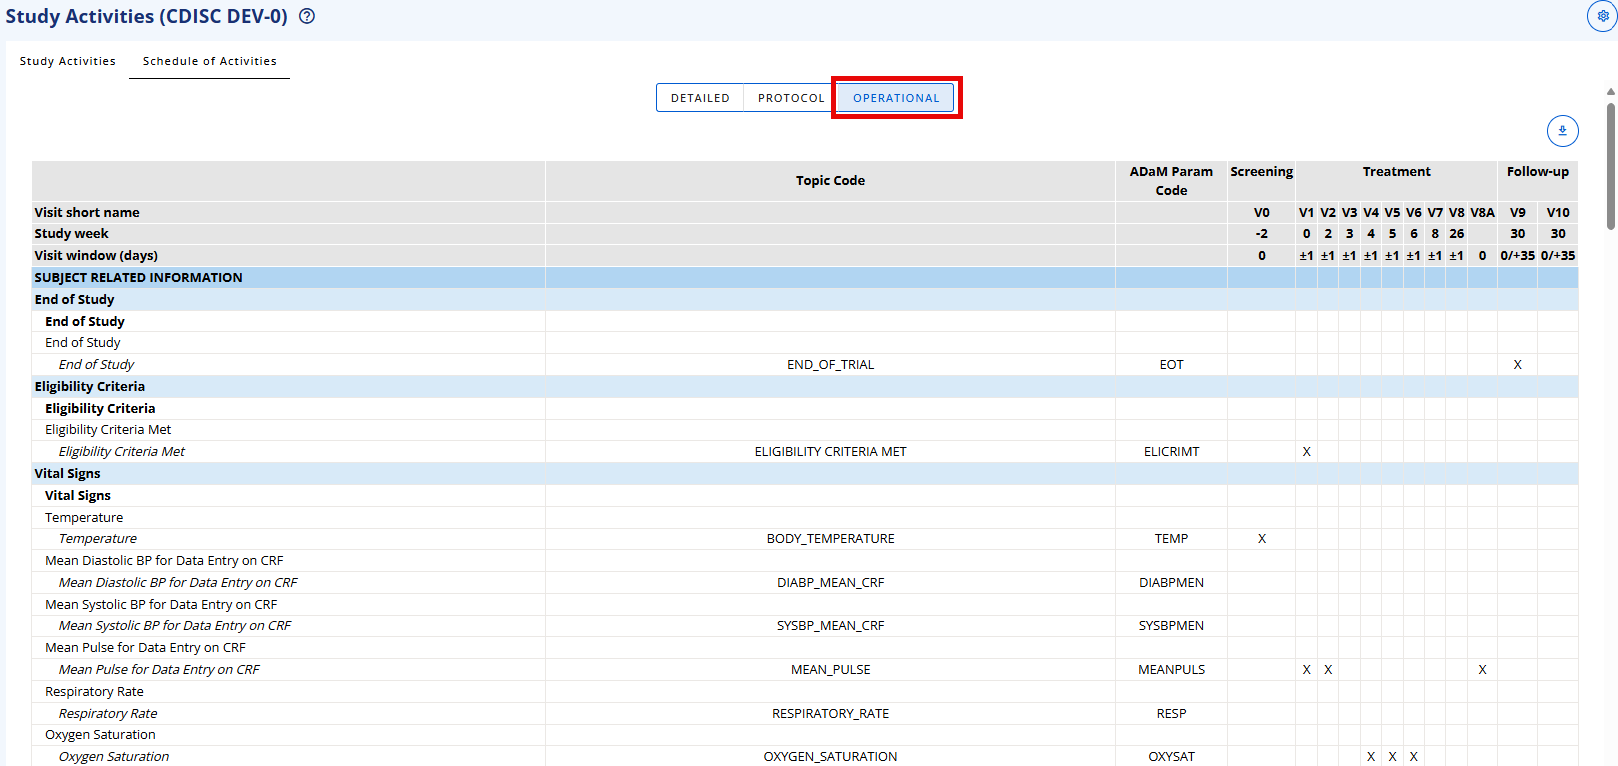
Operational SoA
- The data specification to support data collection specification.
- Correspond to Activity Instances being the Biomedical Concept definition in OpenStudyBuilder as well as our legacy Topic Codes.
- Will also related to specific ADaM PARAM/PARAMCD.
The time unit used for the SoA header row is specified on the Settings form on the top of the Study Activities page.
This page also supports downloads of the SoA data in various file formats.